
Summer DIY: How To Make These Geometric Hanging Planters With Plastic Straws, Garden Wire And Spray Paint
I was window shopping in H&M Home recently when I saw the cute little hanging planter below. As I've previously mentioned, I'm currently doing up my balcony at home for the summer and initially thought this gold number would be a good addition. After contemplating it for a few minutes I decided this planter would not work for several reasons. Firstly it was made of glass, making it perfect for an inside terrarium, but a disaster waiting to happen as a hanging planter outside swinging against a brick wall. Secondly at £24.99 each they were far too expensive, especially as I wanted two of them.

H&M Home Hanging Planter and The Urban Botanist Copper Planter.
I ventured home, planter idea seed sown (excuse the pun) to try and find something similar that didn't contain glass and wasn't as expensive. I found this cooper planter by The Urban Botanist above on Not On The High Street that I also liked, but at £44.95 it was even more expensive than the H&M one! I really didn't want to spend money on a couple of planters that will sit outside all summer (and probably winter when I forget to bring them in) and be covered in rain, soil and bird poo, so that by next summer they look so shoddy I end up throwing them away as I can't get them clean. It was time to trawl Pinterest and see if there were any good DIY hanging planter ideas.
I found that loads of people have been making these geometric decorations called 'Himmeli' which is traditionally a crafty Christmas tree decoration from Finland, and some people had been using them as hanging planters. Reading a few of these posts, people were using brass tubing to make these decorations, but when I checked the cost of brass tubing on Amazon you were looking at between £7-£10 for a few pieces. I wasn't into the brass tubing idea at all as with ordering enough to make two planters (plus extra for postage and mistakes) and having to purchase a tube cutting tool, I was pretty much looking at the same price as the H&M Home planter anyway. I therefore decided to have a pop at making these planters, but swap the tubing for your basic plastic drink straw and use tough garden wire that can be bent to hold the straws in the correct shape.
I brought a multipack of drinking straws from the supermarket for a pound or so, and some garden wire from a gardening shop which is durable but bends really easily and can be cut with a sharp pair of scissors - so no need for tools! The wire cost £1.99 for a massive roll.

What you need to make the planter. Some cut pieces of straw, scissors, garden wire and spray paint.
Start by cutting 21 pieces of straw all one size. You can choose the size yourself depending on how big you want the planter. I cut mine about 6cm each. Then cut 4 long pieces of straw. I chopped my long straw parts before the bendy bit as this gave away the fact they were straws! I also cut a nice long piece of wire, about 200cm long.
I found it easier to follow pictures of the Himmeli instructions than read where to 'thread what bit where', so here is my guide to making this geometric planter in pictures, with some text instructions underneath!
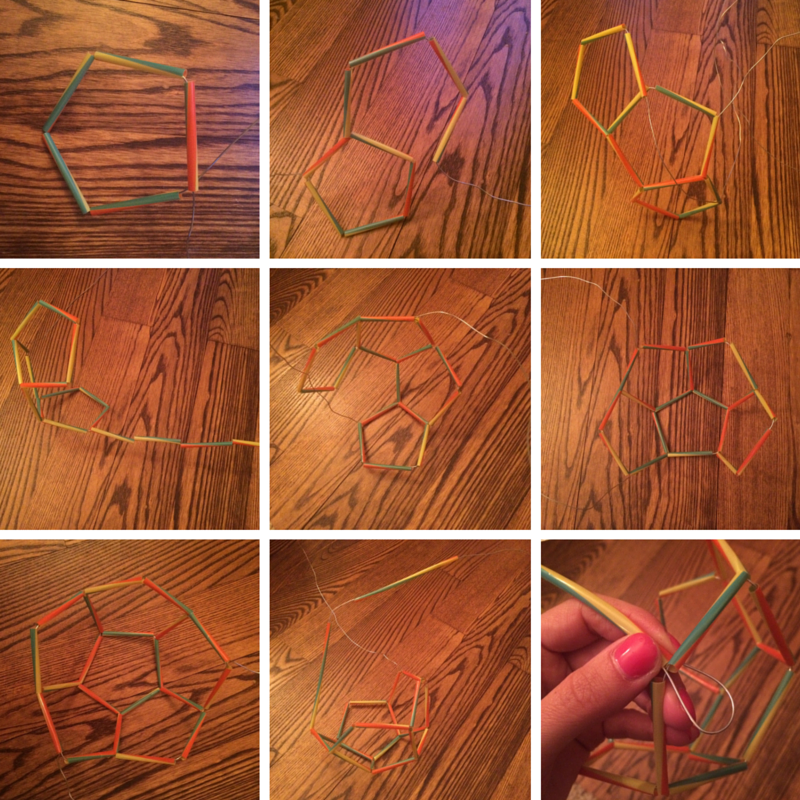
- Start by taking 5 pieces of the short straw parts and thread onto the wire about a third of the way down. Make a pentagon shape by bending the garden wire. Once in a pentagon, thread the wire through the first bit of straw again to make a strong pentagon structure.
- Add 4 more pieces of the short straw, bend, then thread the wire through the original pentagon so they join.
- Keep creating joined up pentagons by adding 4 bits of straw and joining it to the last pentagon until you have the nice flower shape you can see in the picture bottom left.
- Thread the wire pieces upwards through the straws until they come out of the tip of the pentagons to make your hanger section.
- Place one long piece of straw through the wire, bend it, add another long piece then attach it to the opposite pentagon tip and secure the wire. Make sure one pentagon tip has no hanger as you need this space left empty to be able to put in your flower pot.
What you should end up with is something looking like this, which you can then spray paint your desired colour:

Don't worry about bits of wire showing or the pentagons not being perfect as you can adjust the wire and straw parts once the planter contains your pot.
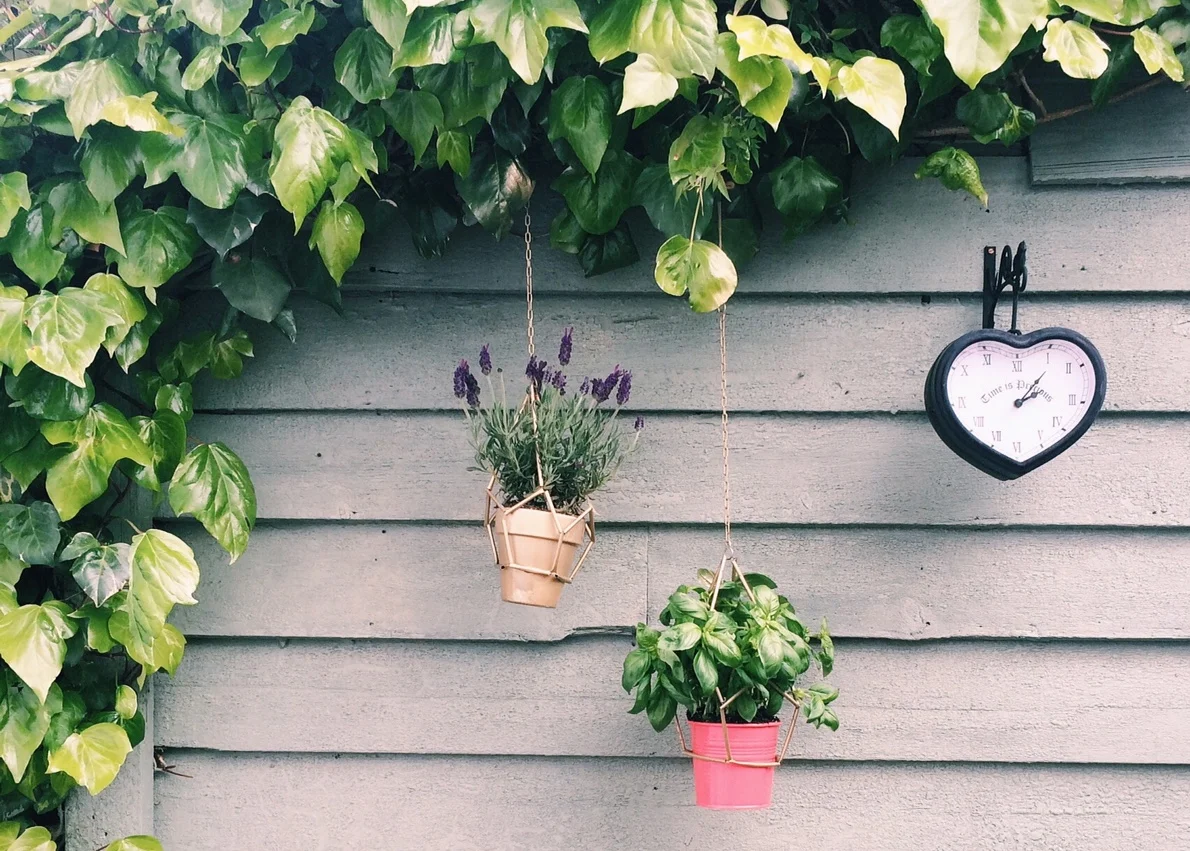
For an extra touch I brought two sink chains from Robert Dyas for £1.79 each, spray painted the chain gold, then used them to suspend my planters.
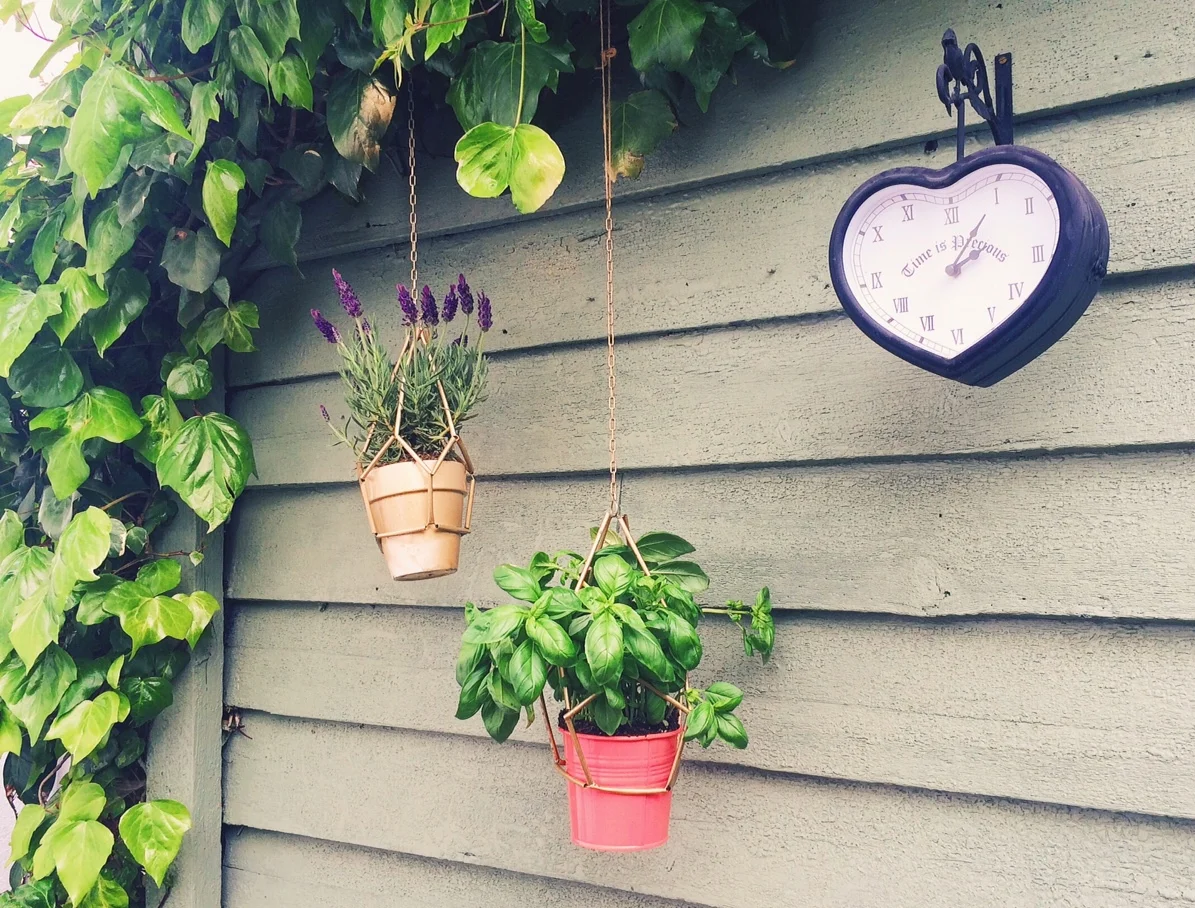
I now have that geometric planter 'look' I wanted for the cost of a few pence, and can dispose of them when the summer ends - no bird poo scrubbing required.