How To DIY This Parisian Style Wall Panelling
An easy step-by-step guide on how to DIY the Parisian style wall panelling that I installed in my bedroom…
Read More
An easy step-by-step guide on how to DIY the Parisian style wall panelling that I installed in my bedroom…
Read MoreOne of the most transformative DIYs that I have recently undertaken was to recover my old bed frame. Read my step-by-step guide on how to do it here…
Read MoreA bright wall mural in a child’s bedroom or nursery is a great way to create a bespoke interior for them, without spending too much money. Thanks to the recent release of Gorilla Crystal Clear Mounting Tape Squares, part of the new Stationary range from Gorilla, I decided to go one step further and create a 3D wall mural in my son’s bedroom. These clear, pre-cut 1” x 1” squares allowed me to bond toys and figures to the mural up to seven pounds in weight, adding another dimension to the landscape scene that I had painted.
Read MoreMy house needed a facelift. Lots of bad British weather, a leaky gutter and rotting windows were just not doing this beautiful Georgian building any justice. A priority was sorting out the front door. Placed perfectly in the centre of the symmetrical exterior, the front door is the focal point when you look at my house from the street. Having not been touched in well over 5 years, the door was faded and cracked. While the conservative, Oxford blue that it once was didn’t give me any pangs of excitement when I looked at it.
Read MoreWithout a doubt, the questions that I get asked about the most are all centered around paint. What’s the best type of paint to use on radiators? What paint should I use on windows? Should I use gloss or eggshell? What paint is best with kids and pets? So, in order to round up all these questions, I’ve decided to dedicate a full blog post on the types of paint you can buy, the different finishes and where you should use them in and around the home.
Read MoreIce-cream and sorbet shades are the key colours in interiors for summer 2019, with minty hues really making my heart flutter! Mint is a really retro colour, so it works perfectly on fun, accent furniture such as drinks cabinets. Both Anthropologie and John Lewis are currently selling mint cabinets and even though I really wanted one for summer cocktails, I couldn’t justify spending a few hundred pounds on a non-essential piece of furniture. Instead, I decided to DIY one using a basic wood IKEA cabinet, paint, some MDF and my trusty Gorilla Glue products.
Read MorePaint is a powerful tool. With paint, you can make a smaller room feel much larger just by choosing the right shade. You can also ‘hide’ ugly items such as radiators by painting them in the same colour as the wall behind it. In my hallway, I wanted the reverse side of my front door to feel much grander. It’s a beautiful door and I wanted to draw as much attention to it as possible! Apart from just painting it an attention-grabbing bight teal, I also tricked the eye into thinking it is bigger by painting over the door frame and onto the wall.
Read MoreHaving previously painted the back of my front door this vivid turquoise colour, I really wanted to make the most of this attention-grabbing entryway so decided to create a dried flower wreath that would stand out against the bold hue.
Read MoreClear acrylic or Perspex furniture and home accessories are brilliant if you want your room to feel spacious, uncluttered and airy. The fact that you can ‘see-through’ the piece means that it does not feel bulky or chunky in a space. In my new home office, the room is quite small and my new desk is so beautiful, the last thing I wanted to do was cover it up. I did, however, require a few organisational desk accessories, so decided to create this DIY acrylic tray.
Read More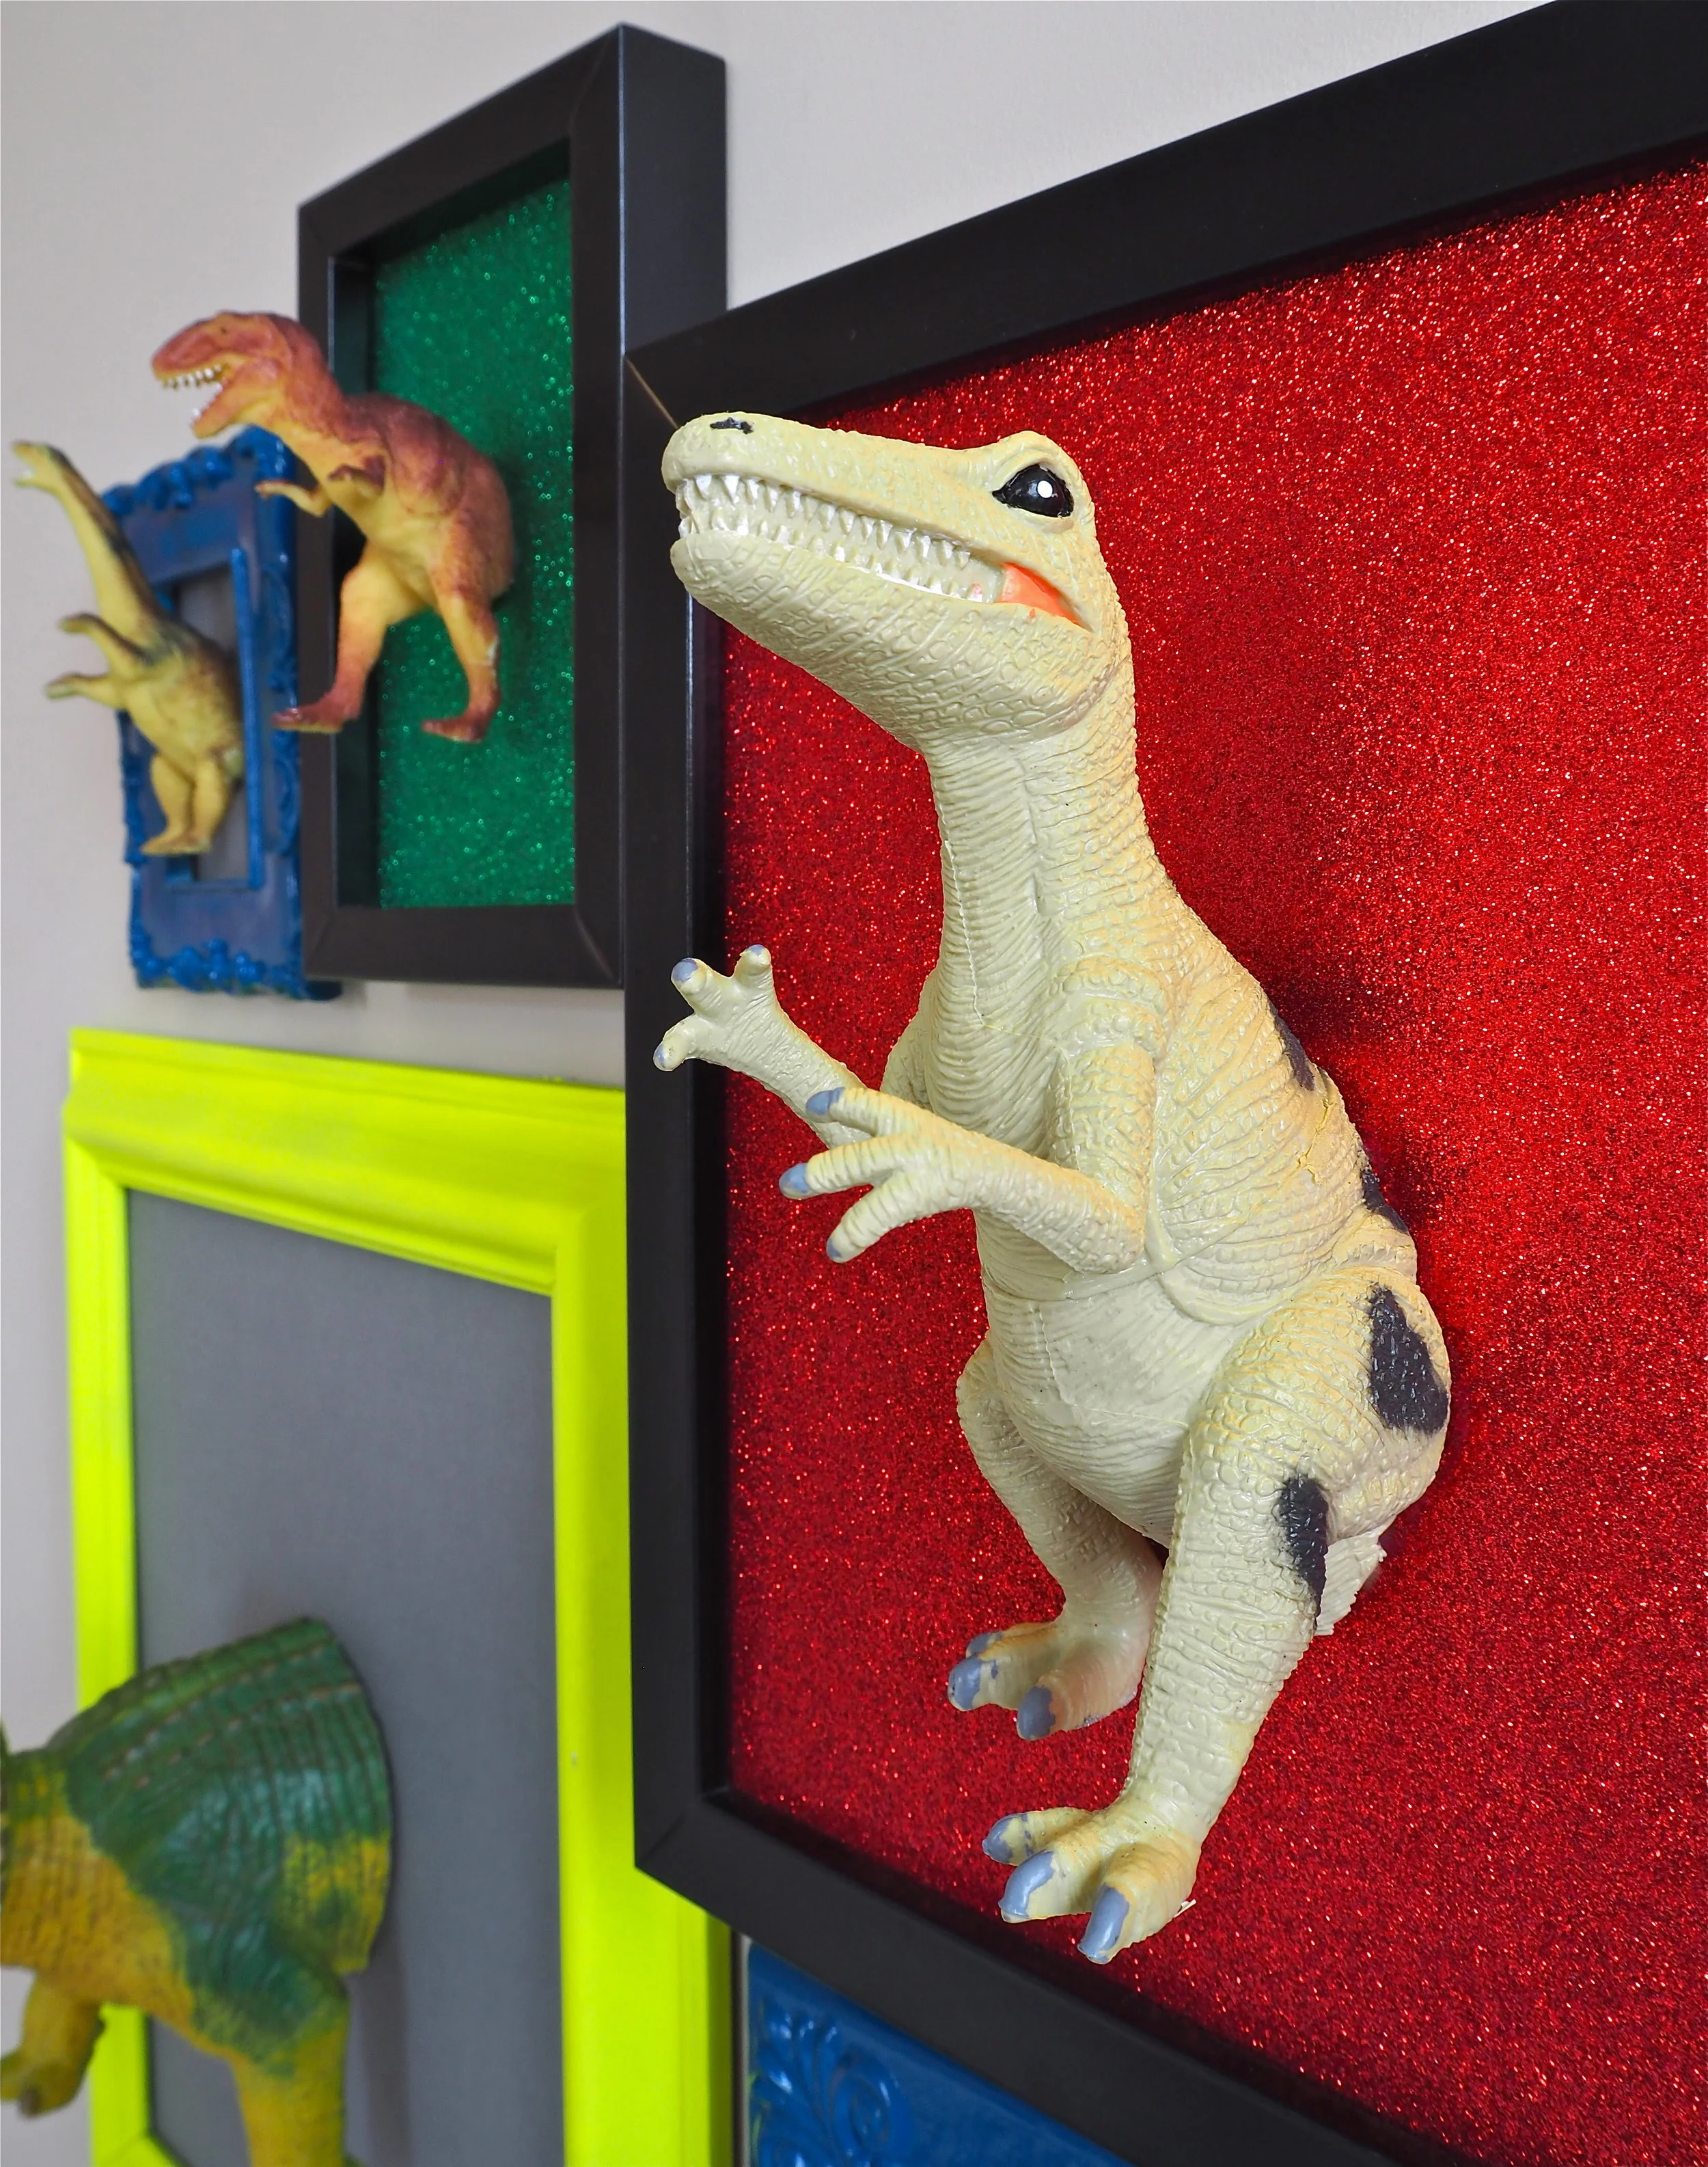
How to make this 3D Dinosaur art for a kids’ room using plastic dinosaurs and old pictures frames.

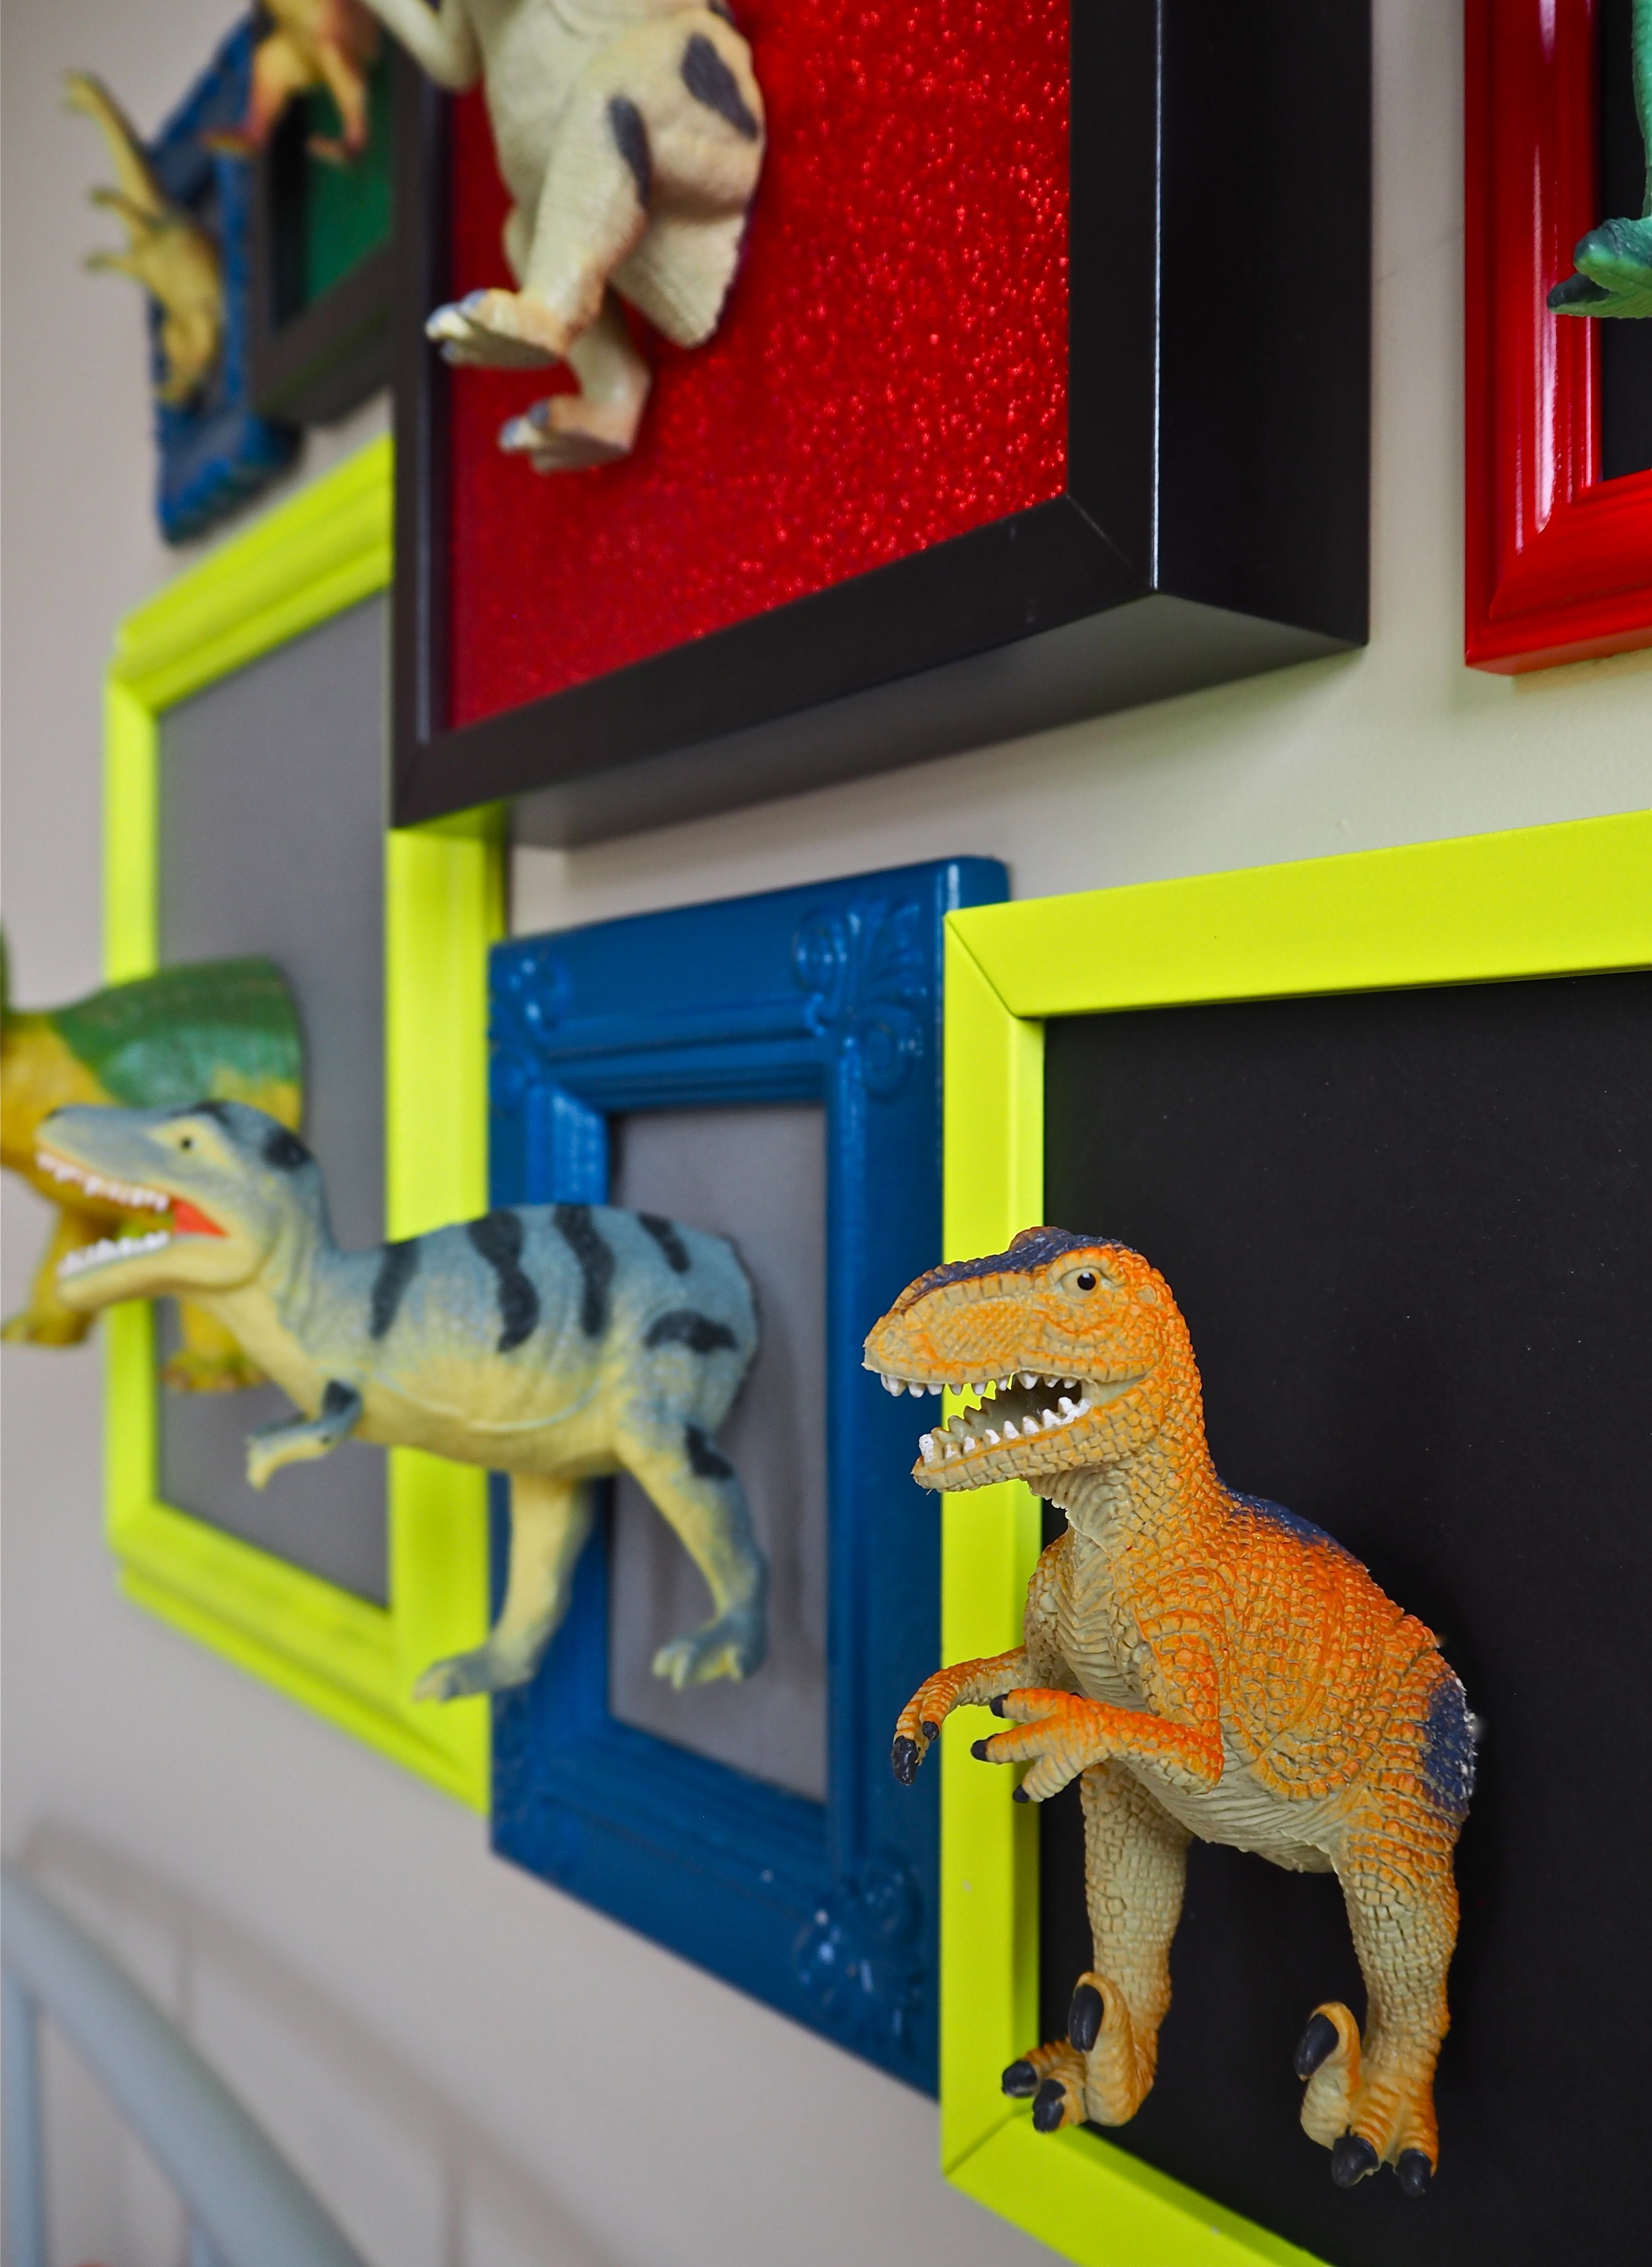

If you do not have any dinosaur figures to hand, used plastic dinosaurs are ten a penny in charity shops and car boot sales across the country. In fact, I picked up most of the dinosaurs used in this DIY in the first charity shop I popped into on my local high street! While I was in there I also sourced a collection of frames in different shapes and sizes. I just removed the old artwork and cleaned up the frames they came in.
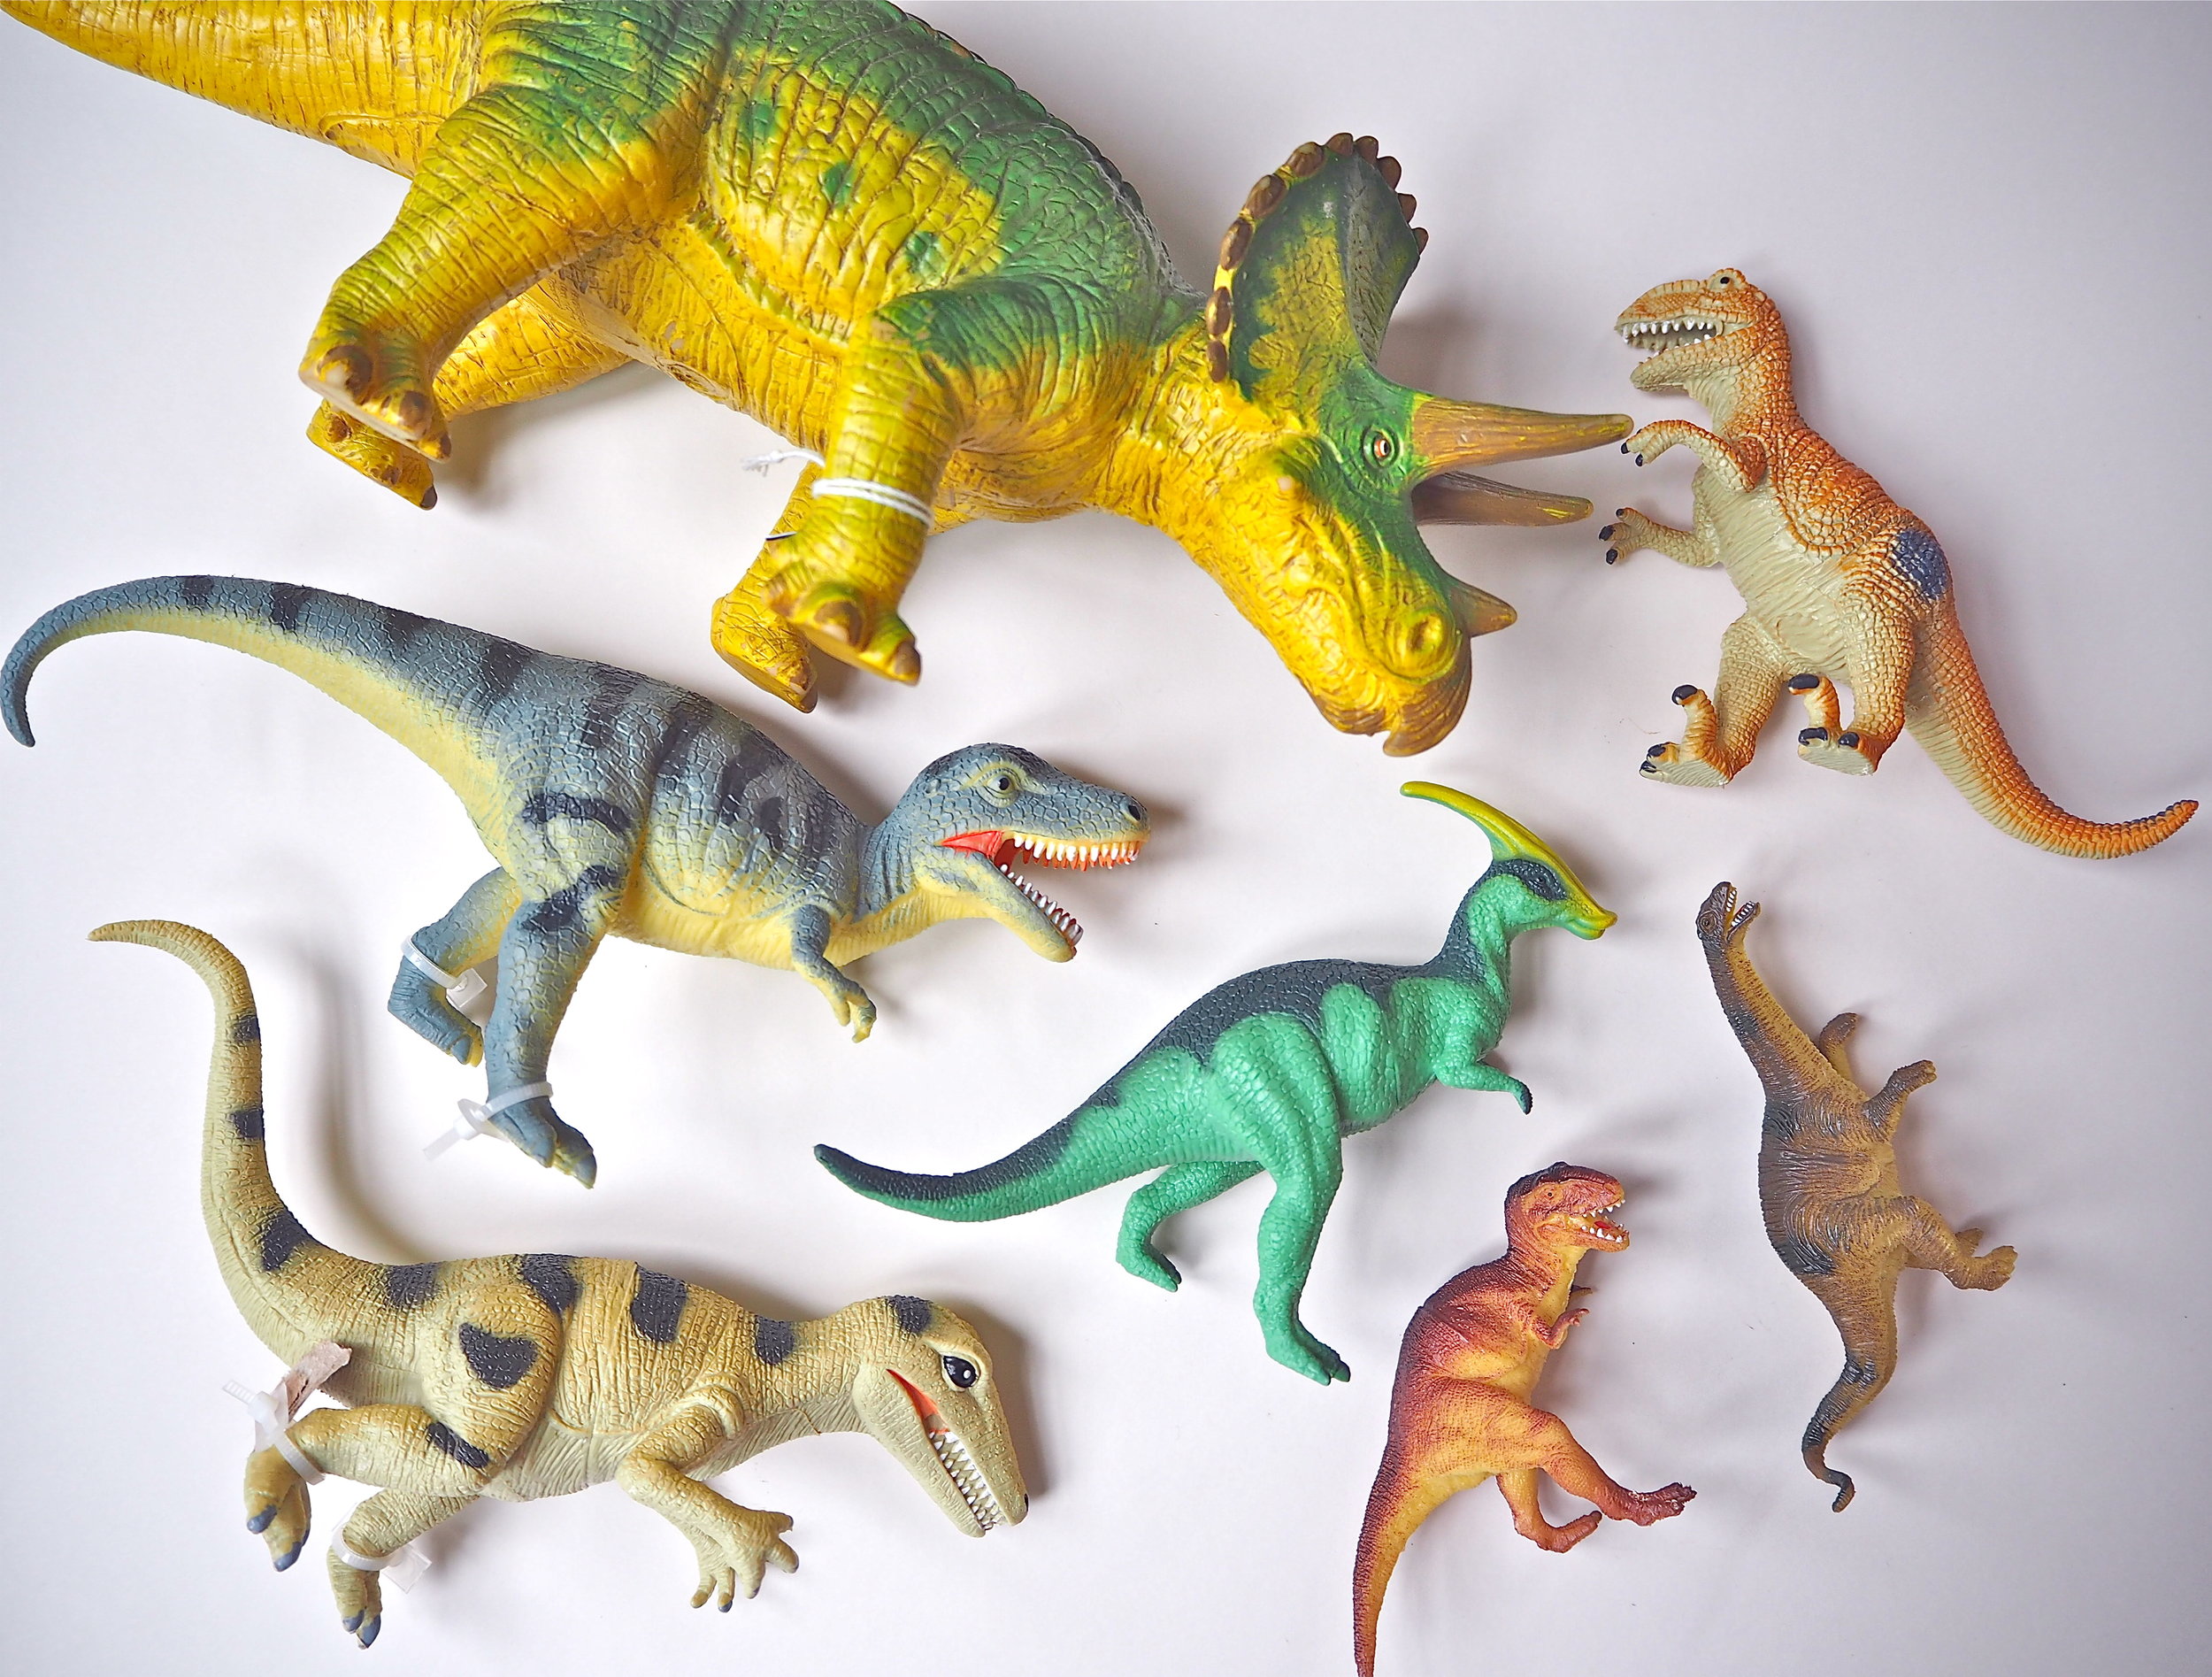

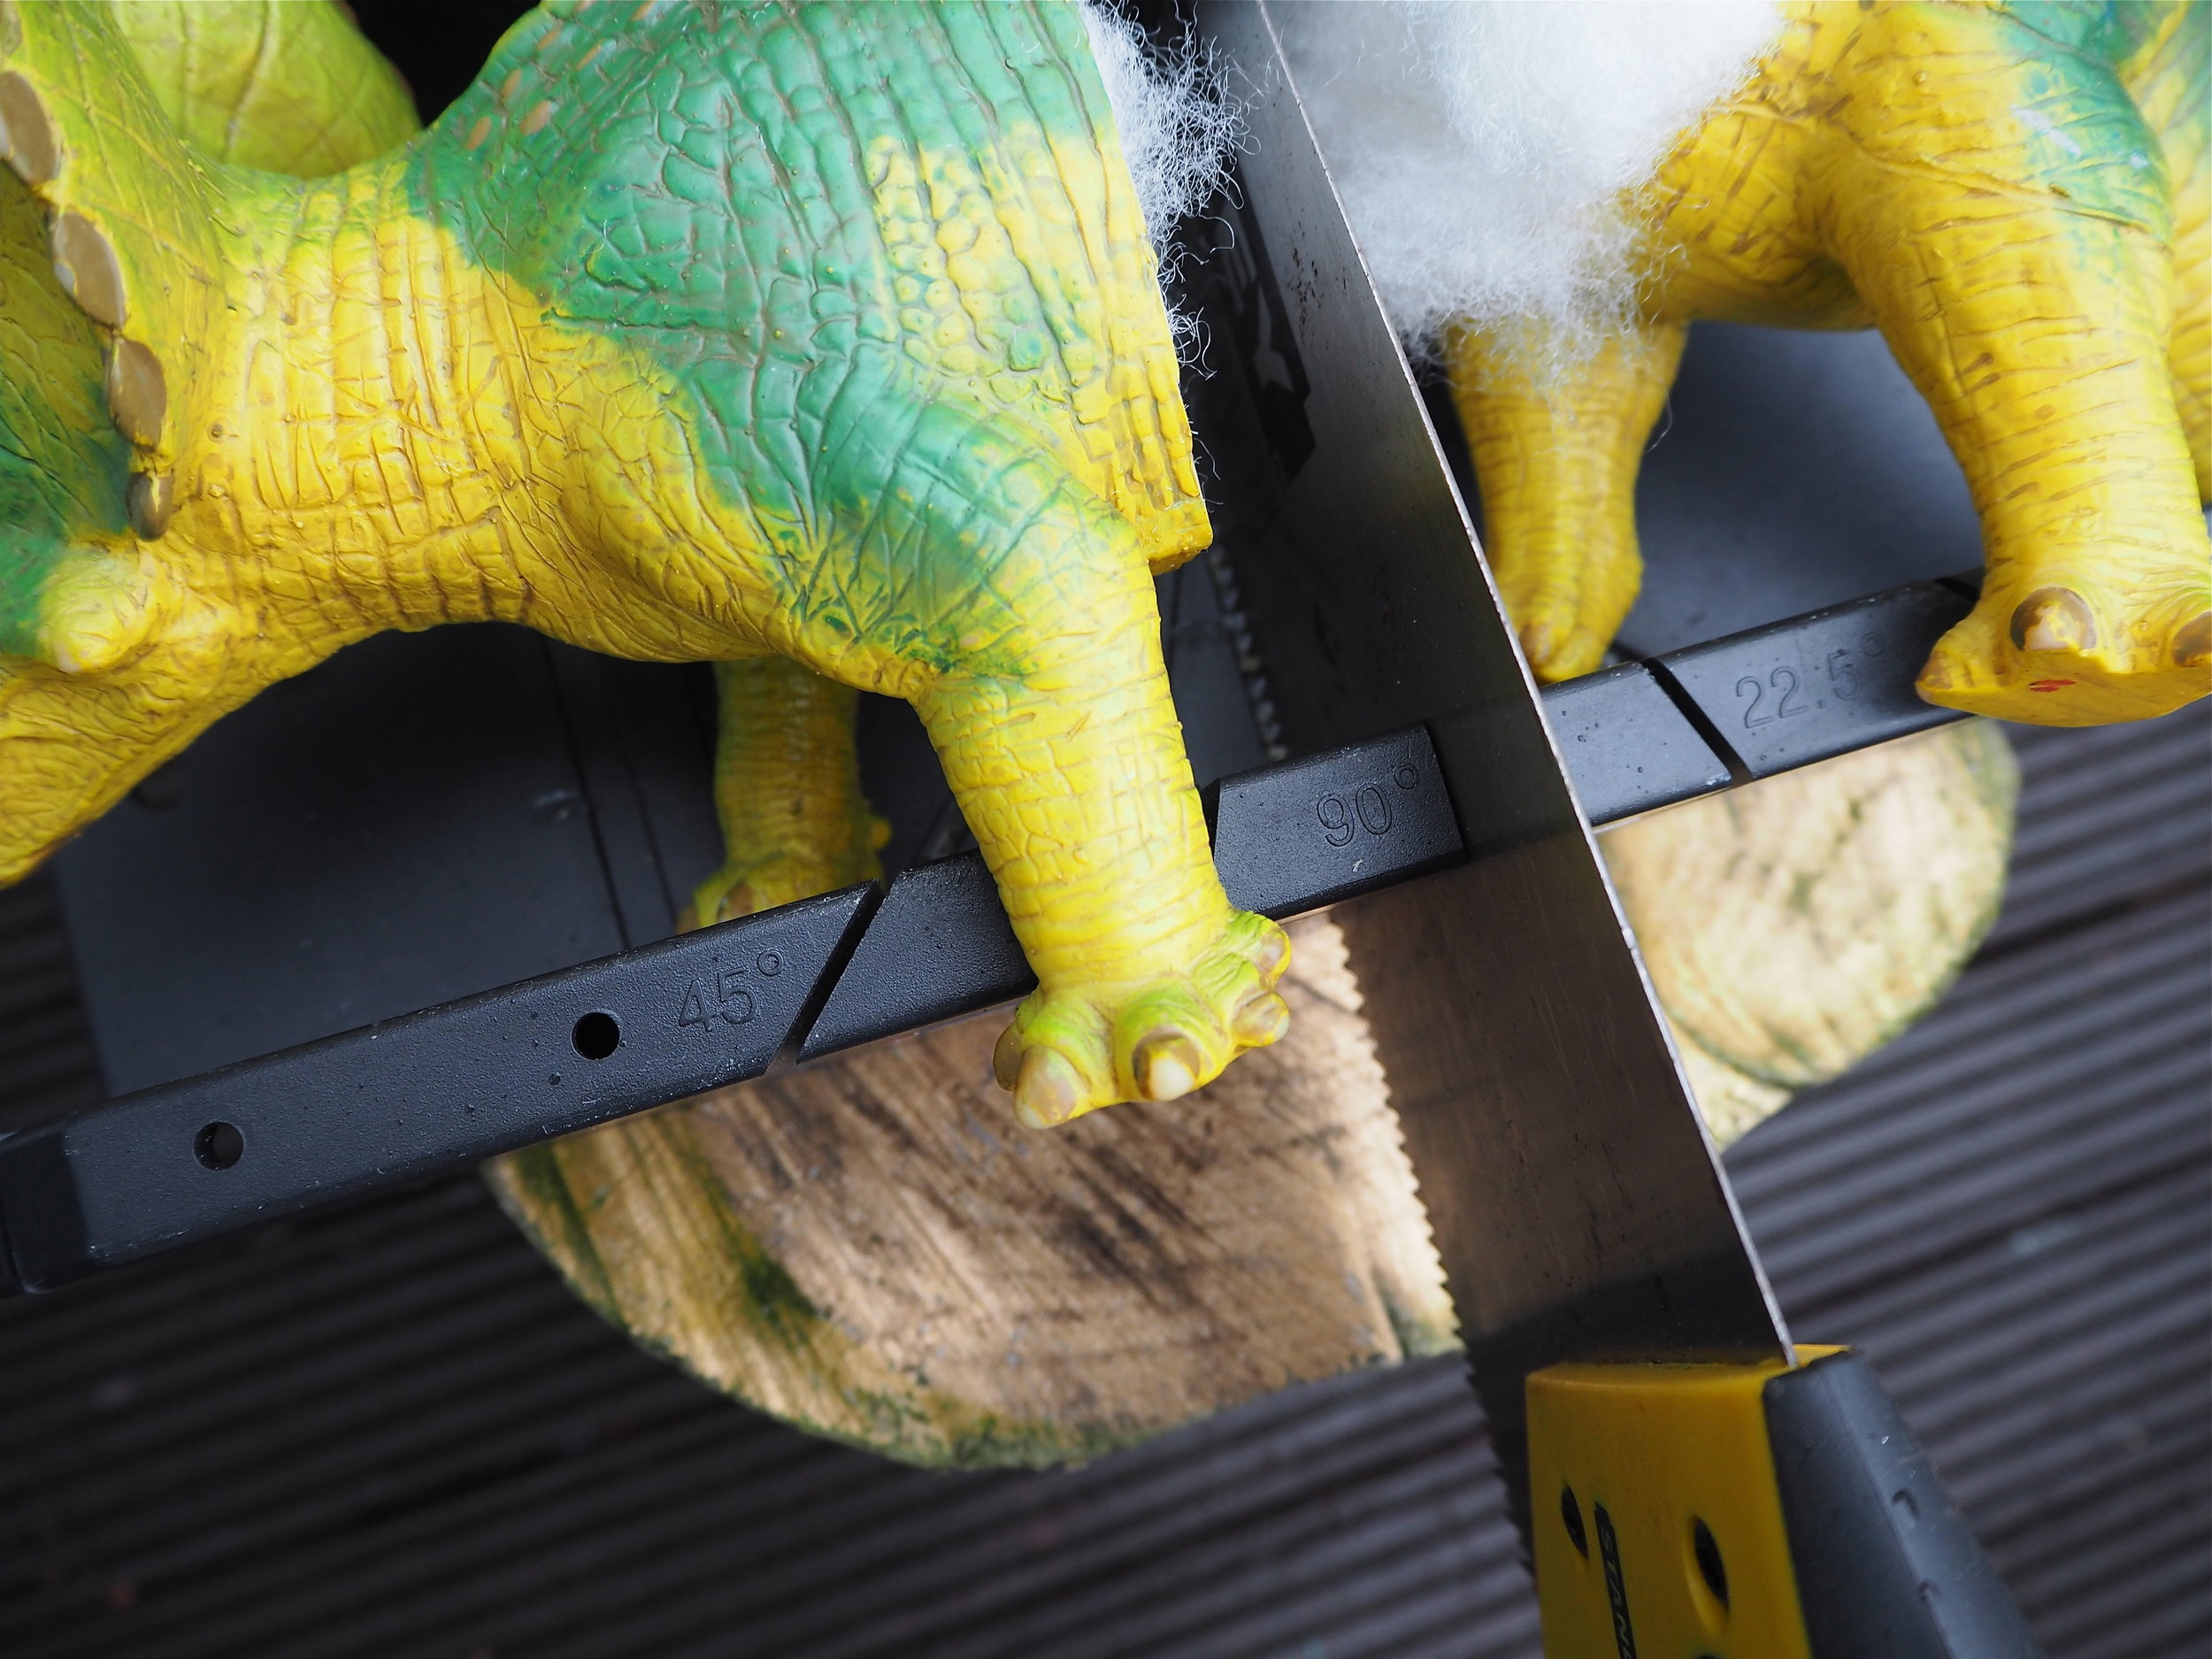
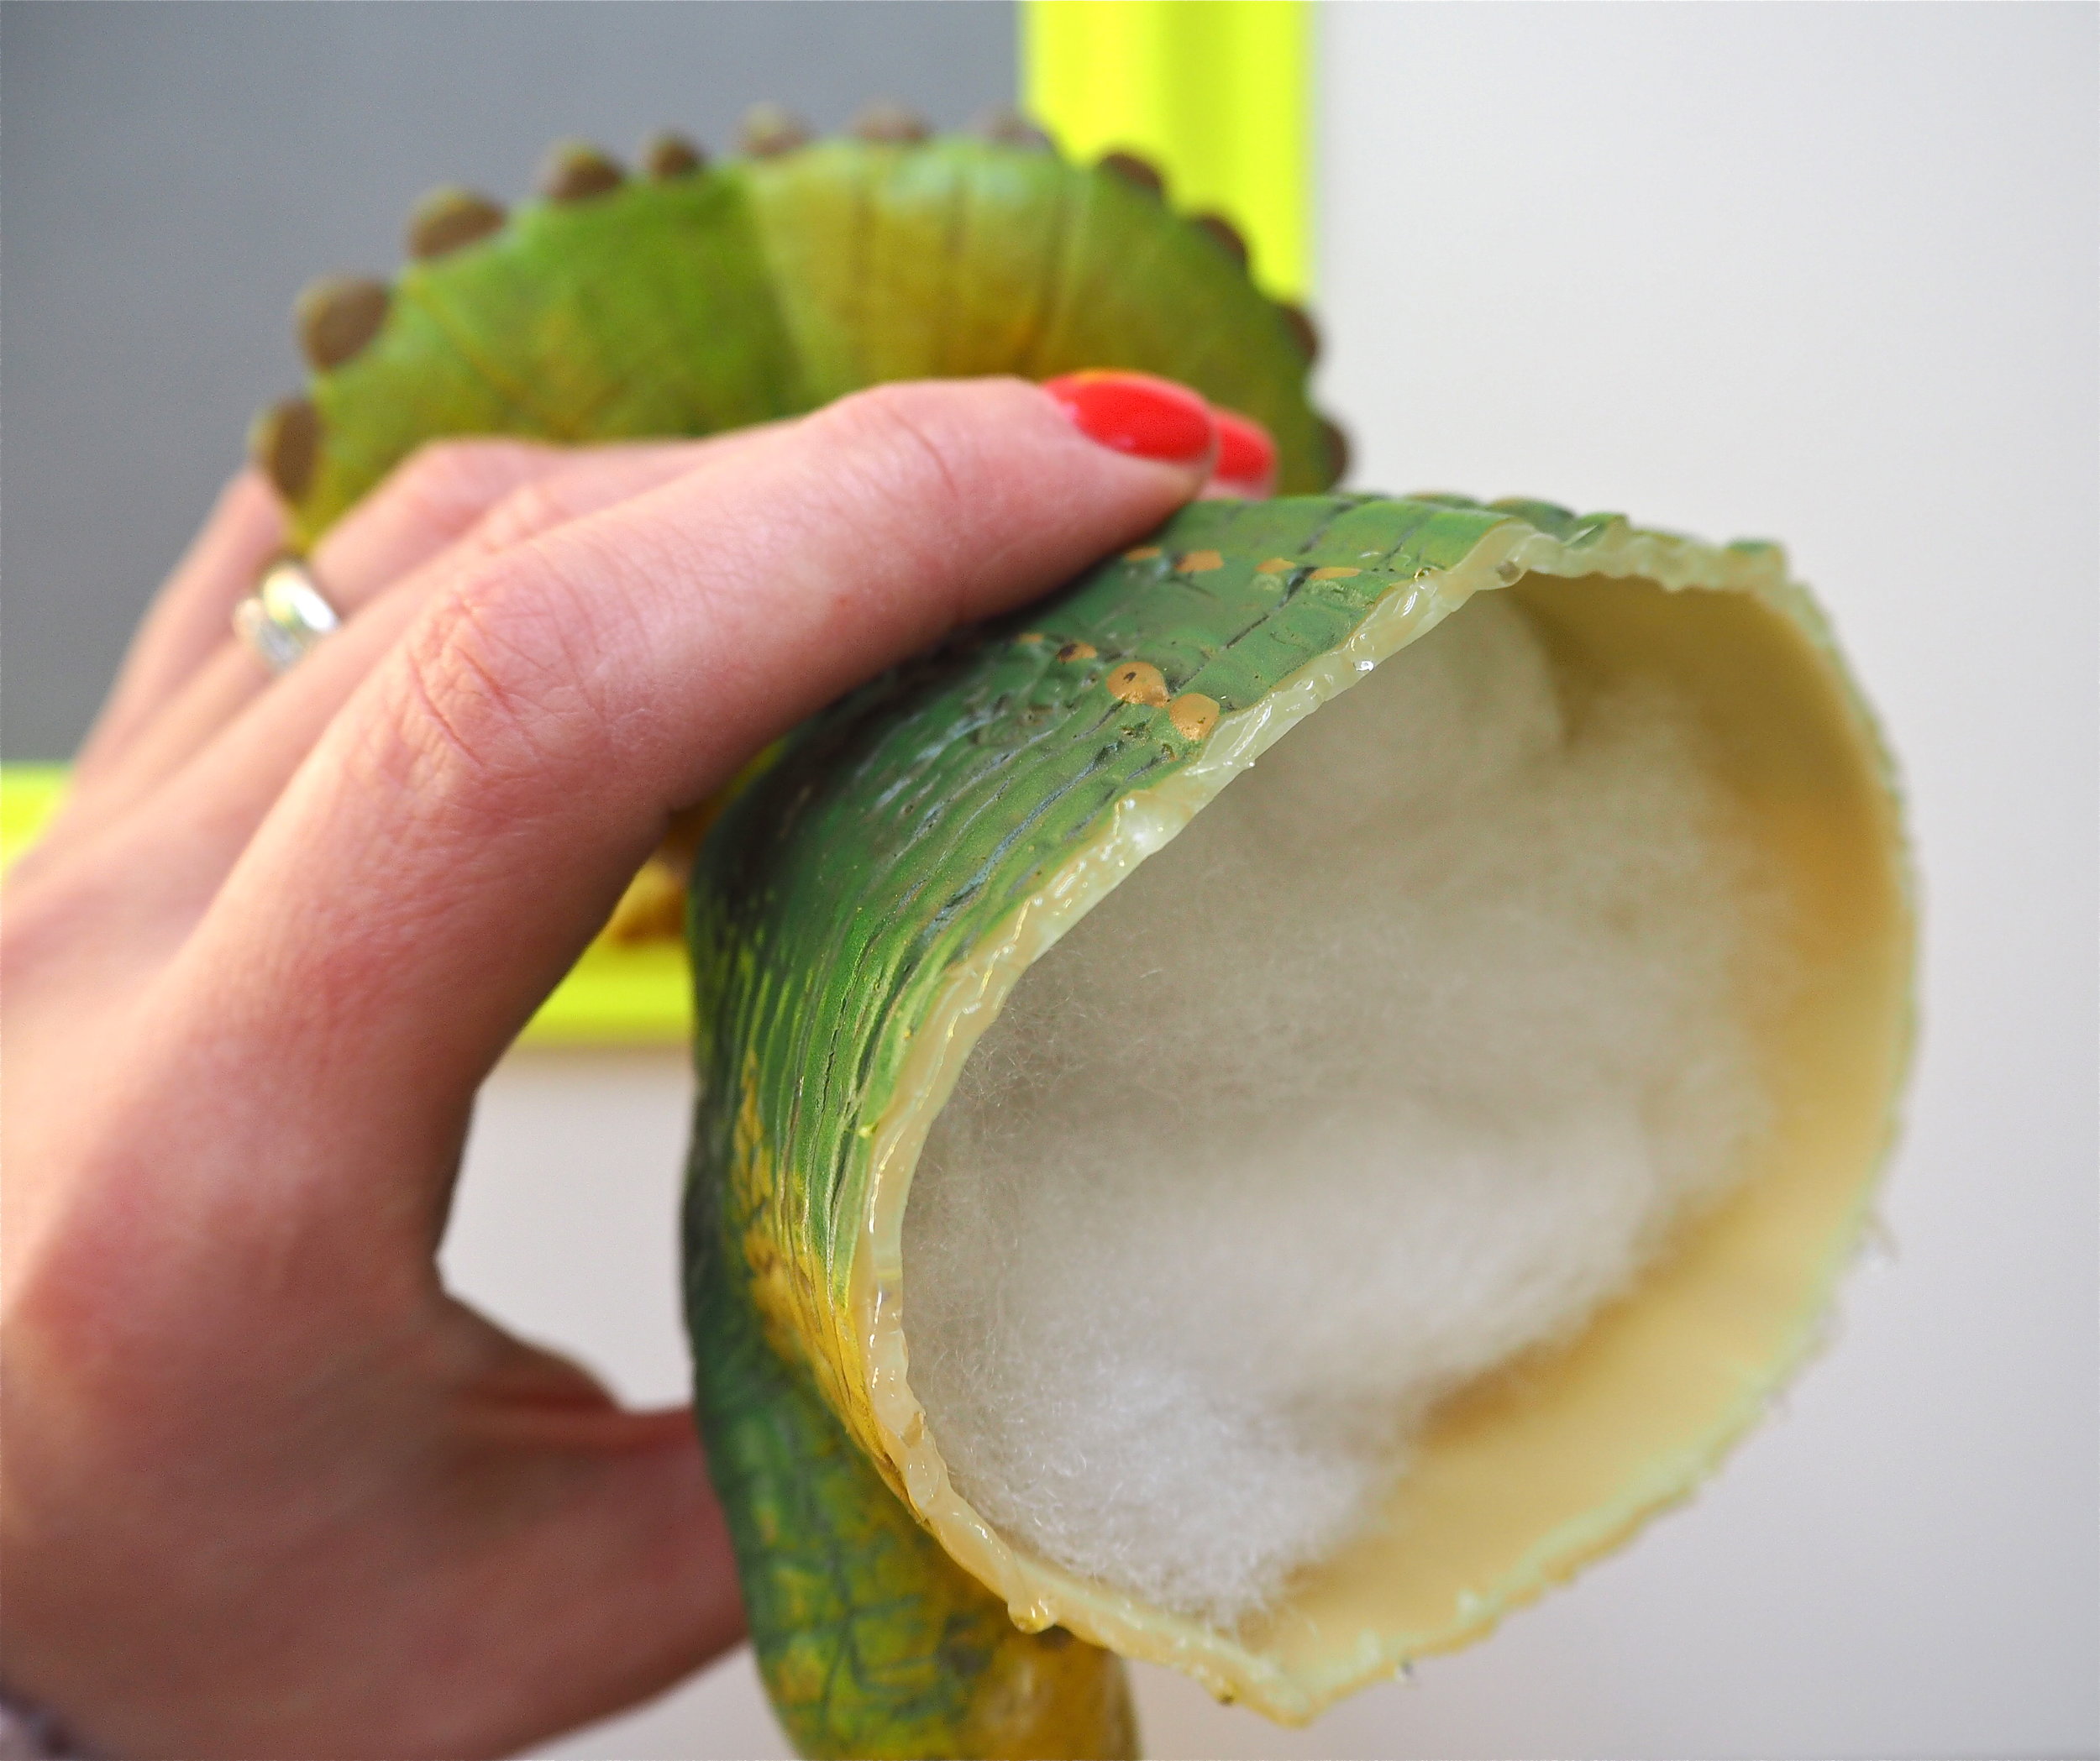
The first step in creating this DIY is to dispose of the back end of the dinosaur! I took each dinosaur and worked out what I wanted to ‘pop’ out of the frame and what I could get rid of from the back. I mostly kept all legs but got rid of the tail. You do not want your dinosaur to be too top-heavy, but if it is missing a leg it might look strange. Work out your cutting point and then slice him in two using a handsaw. I used a mitre box so that I could make a nice clean, straight chop. However, a mitre box is not essential if you have a good grip.

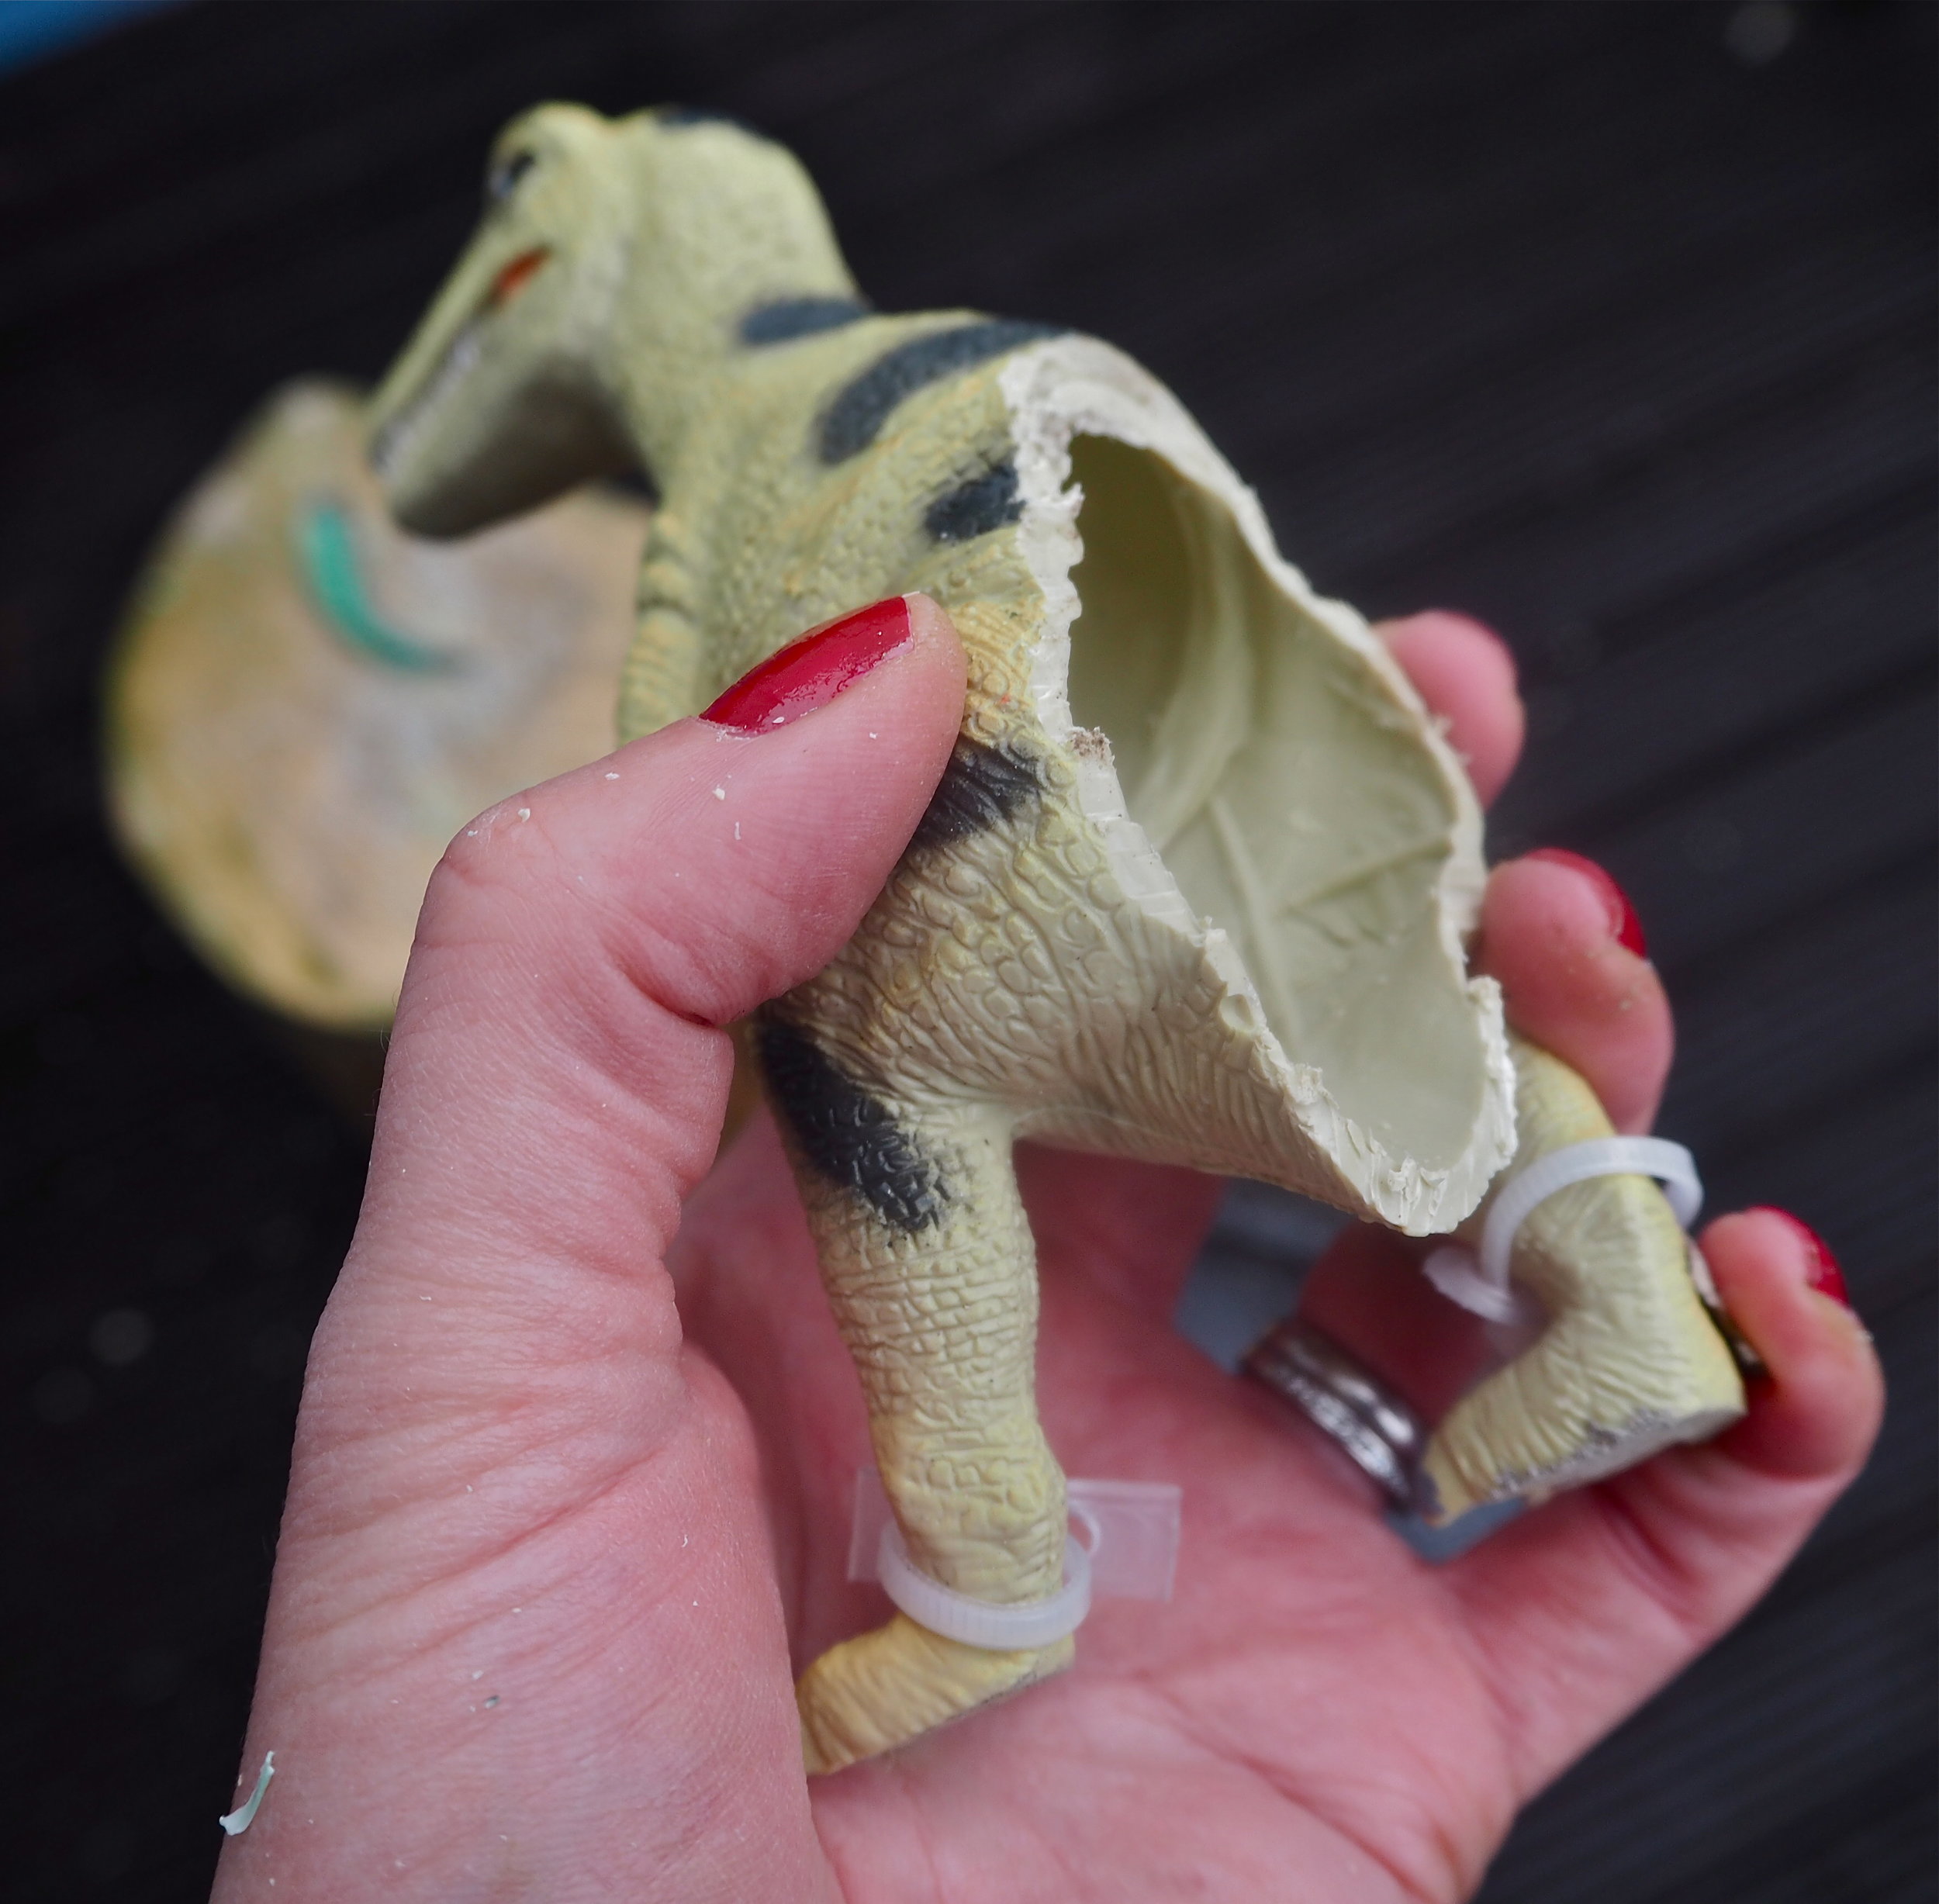
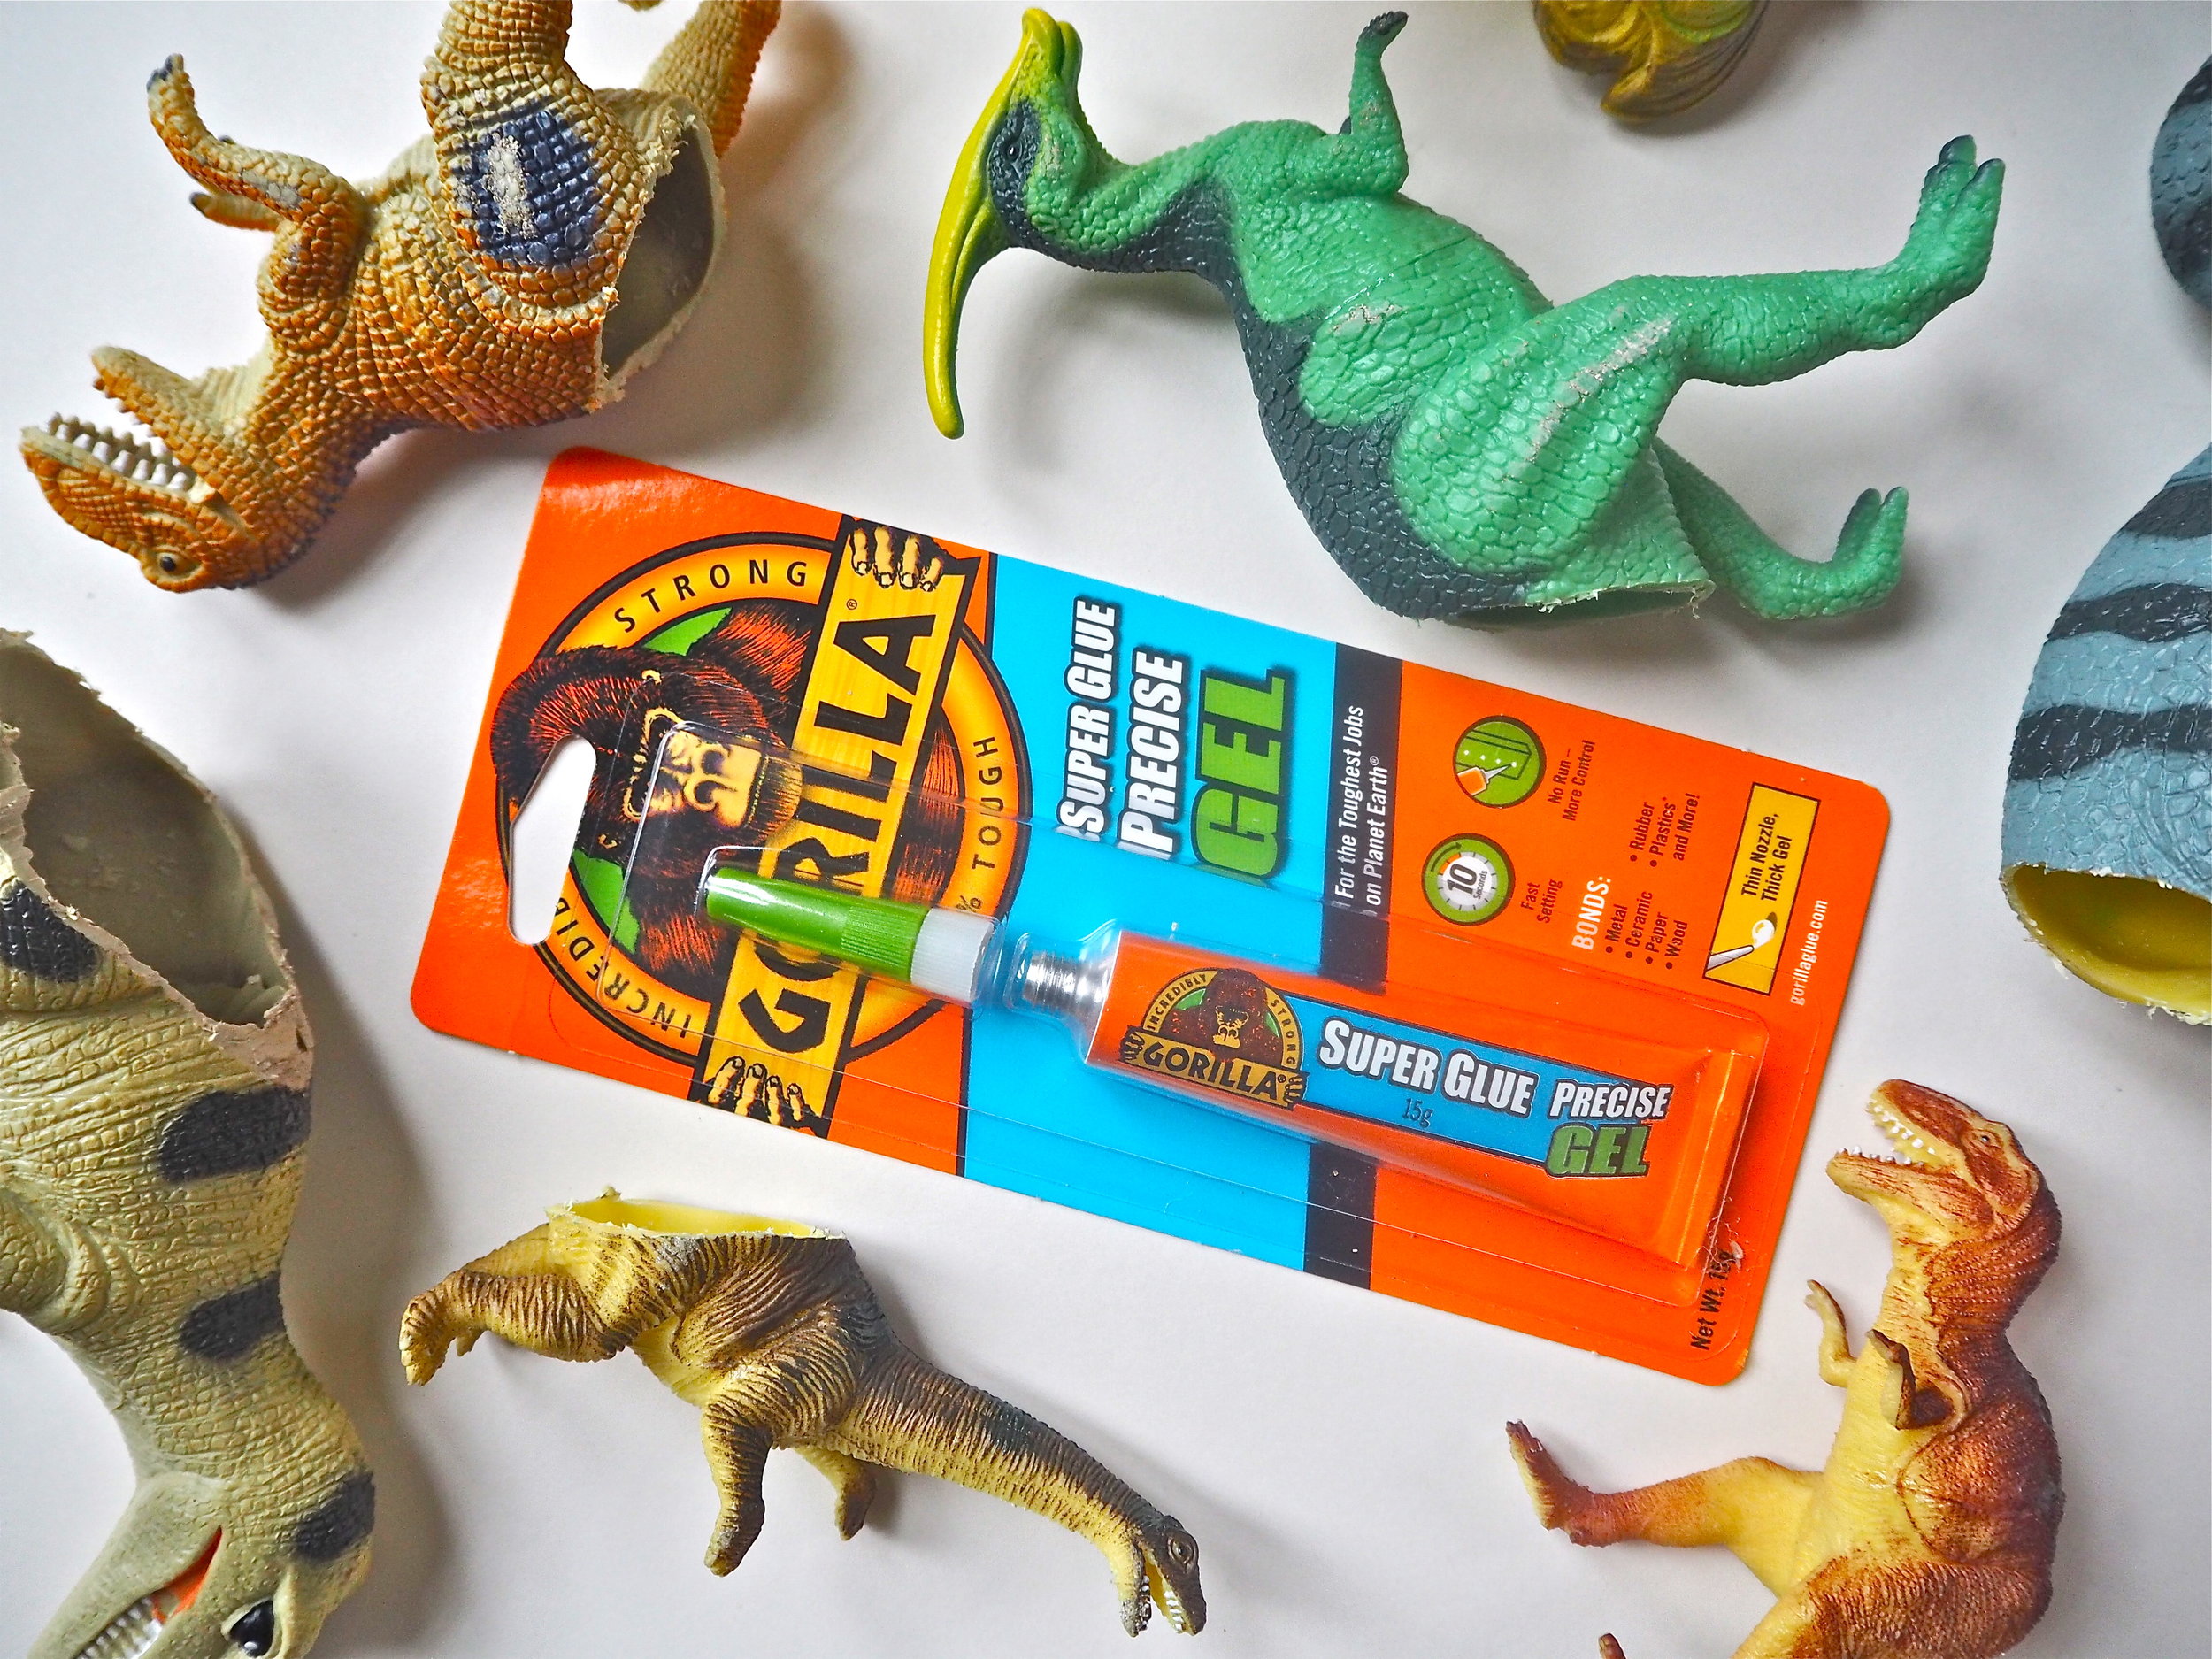
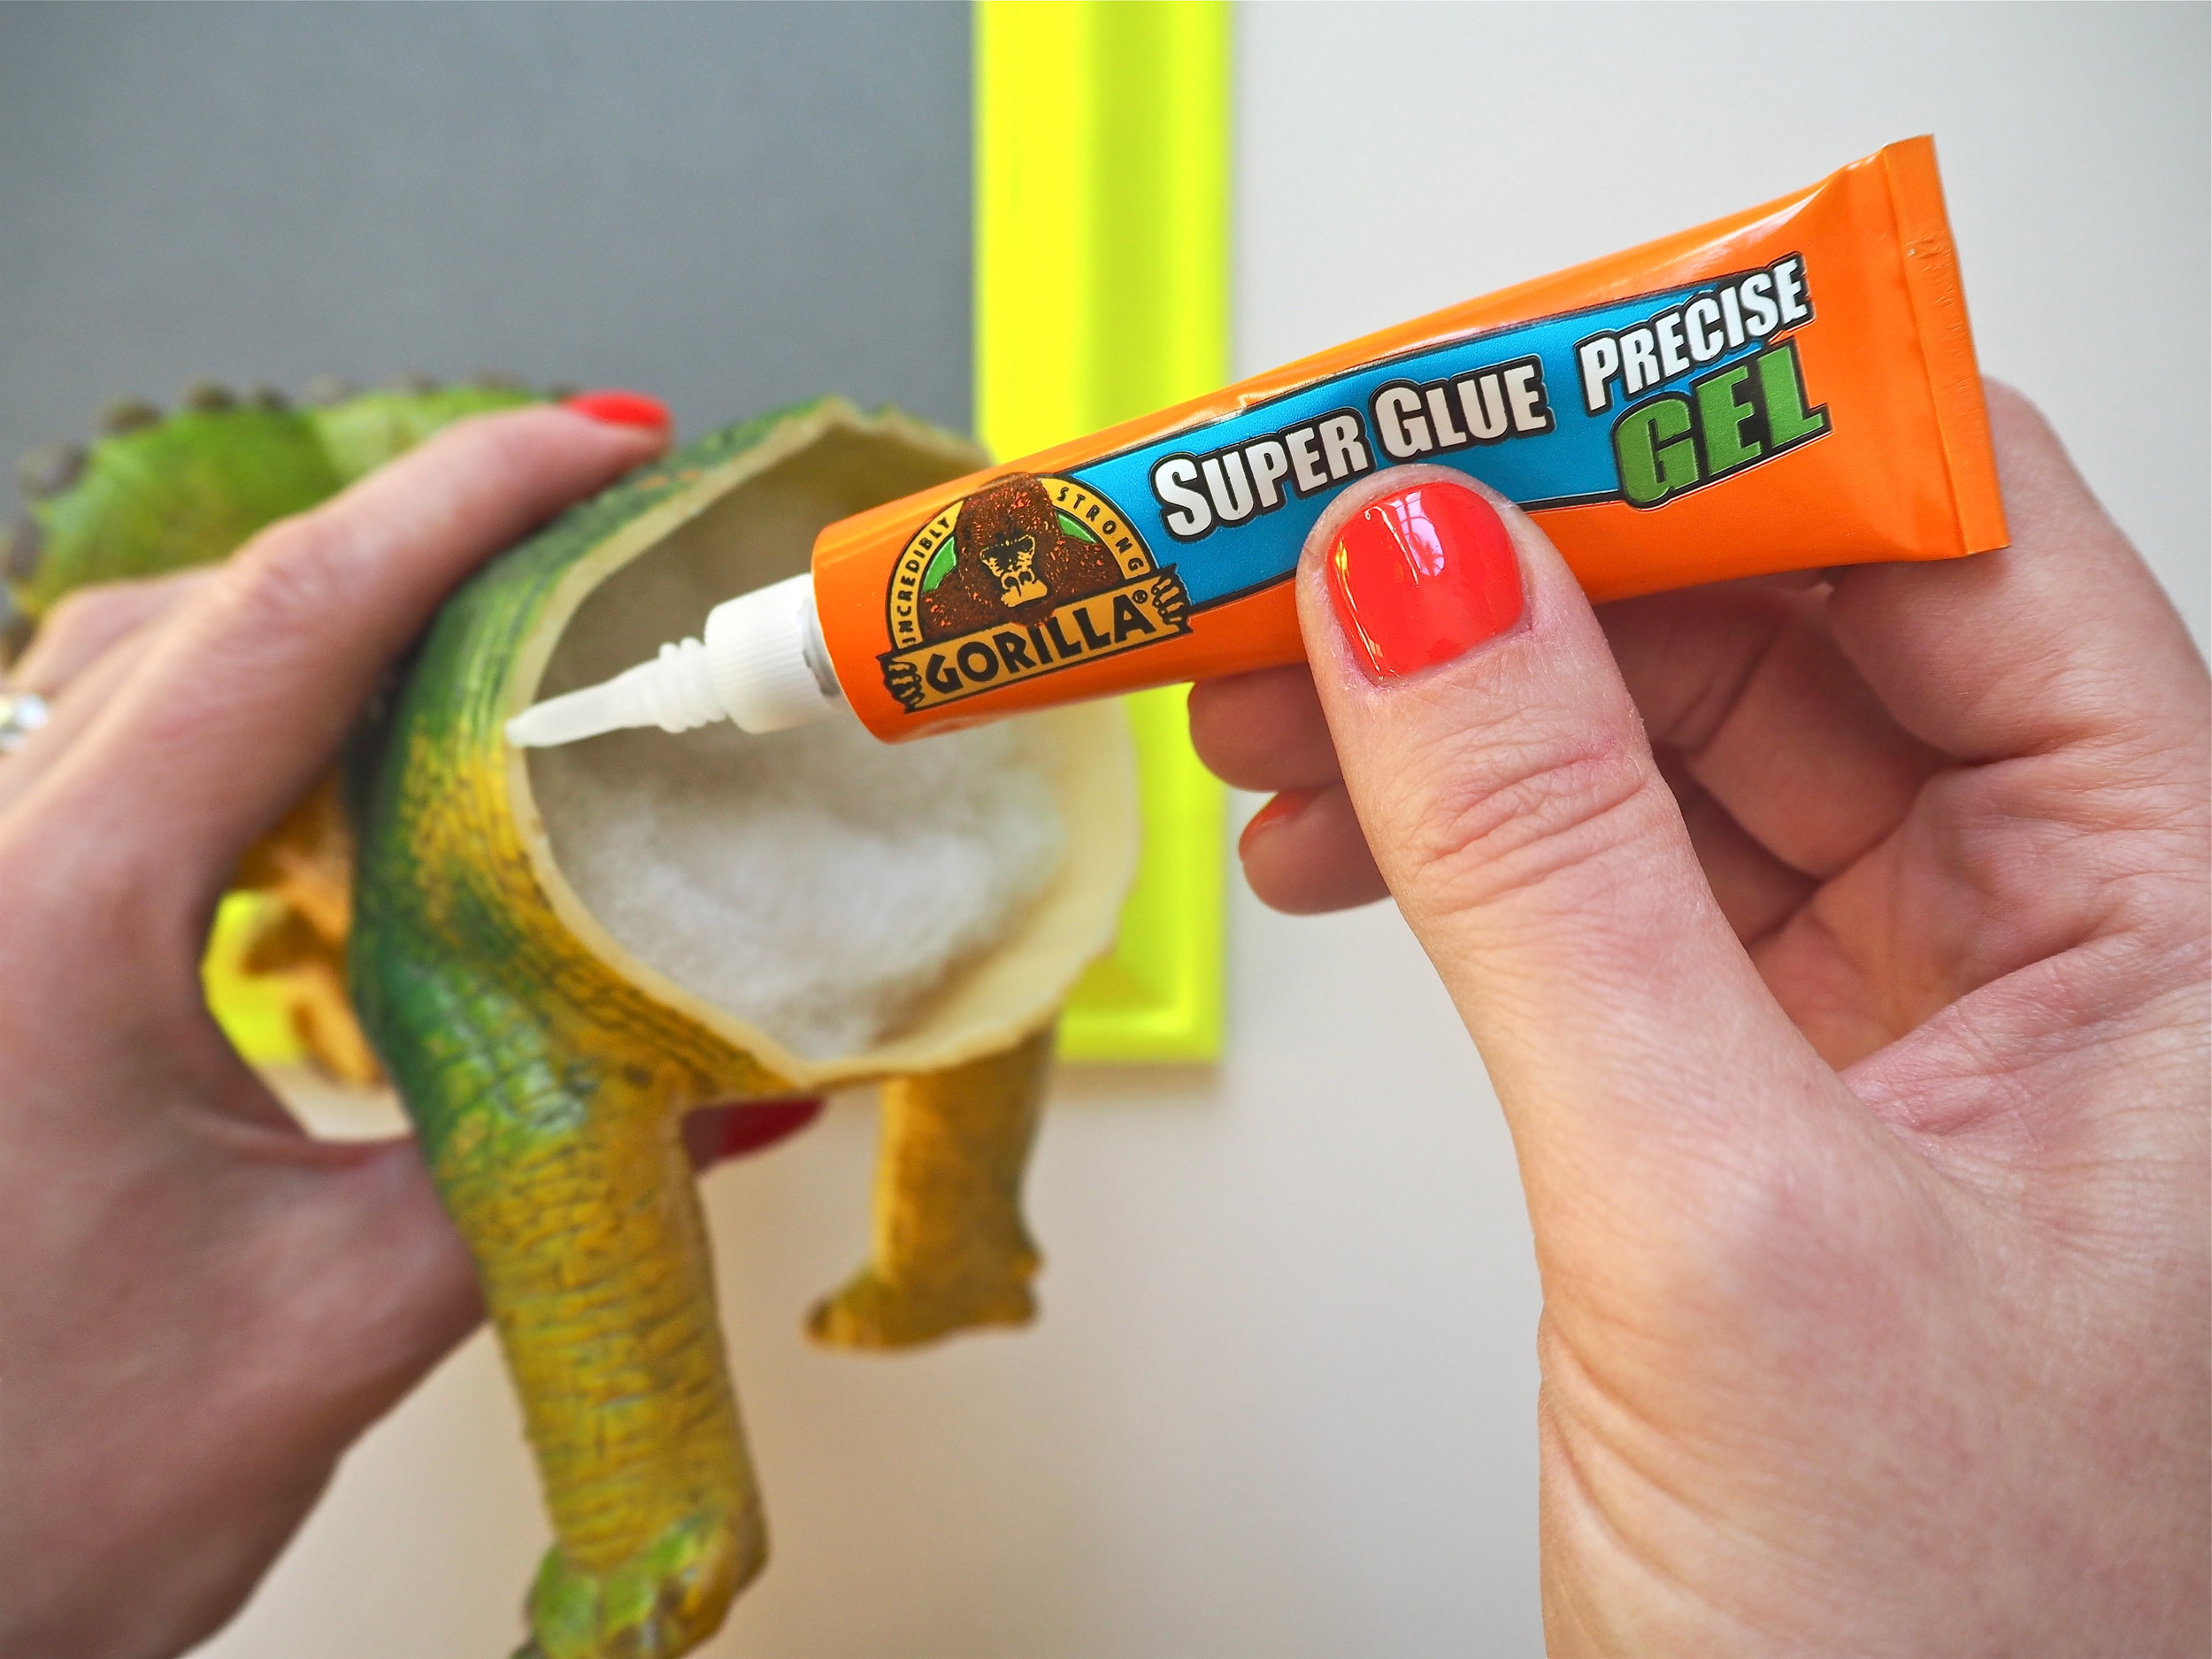
Once you’ve cut your dinosaurs you’ll find that in most instances your dinosaur is hollow and the sawed plastic rim you need to glue onto your mount inside the frame is quite thin. This is why I chose to use Gorilla Super Glue Precise Gel for this DIY. The gel can be applied in a very precise manner with the thin nozzle. As the glue is a thick gel it will not run, meaning that I can apply it to the cut outline easily without mess. The Precise Gel bonds metal, wood, ceramics, paper, rubber and plastics*. As my dinosaurs are a mix of rubber and plastic to be secured to the card, I knew this was the perfect product to use as they would join successfully.
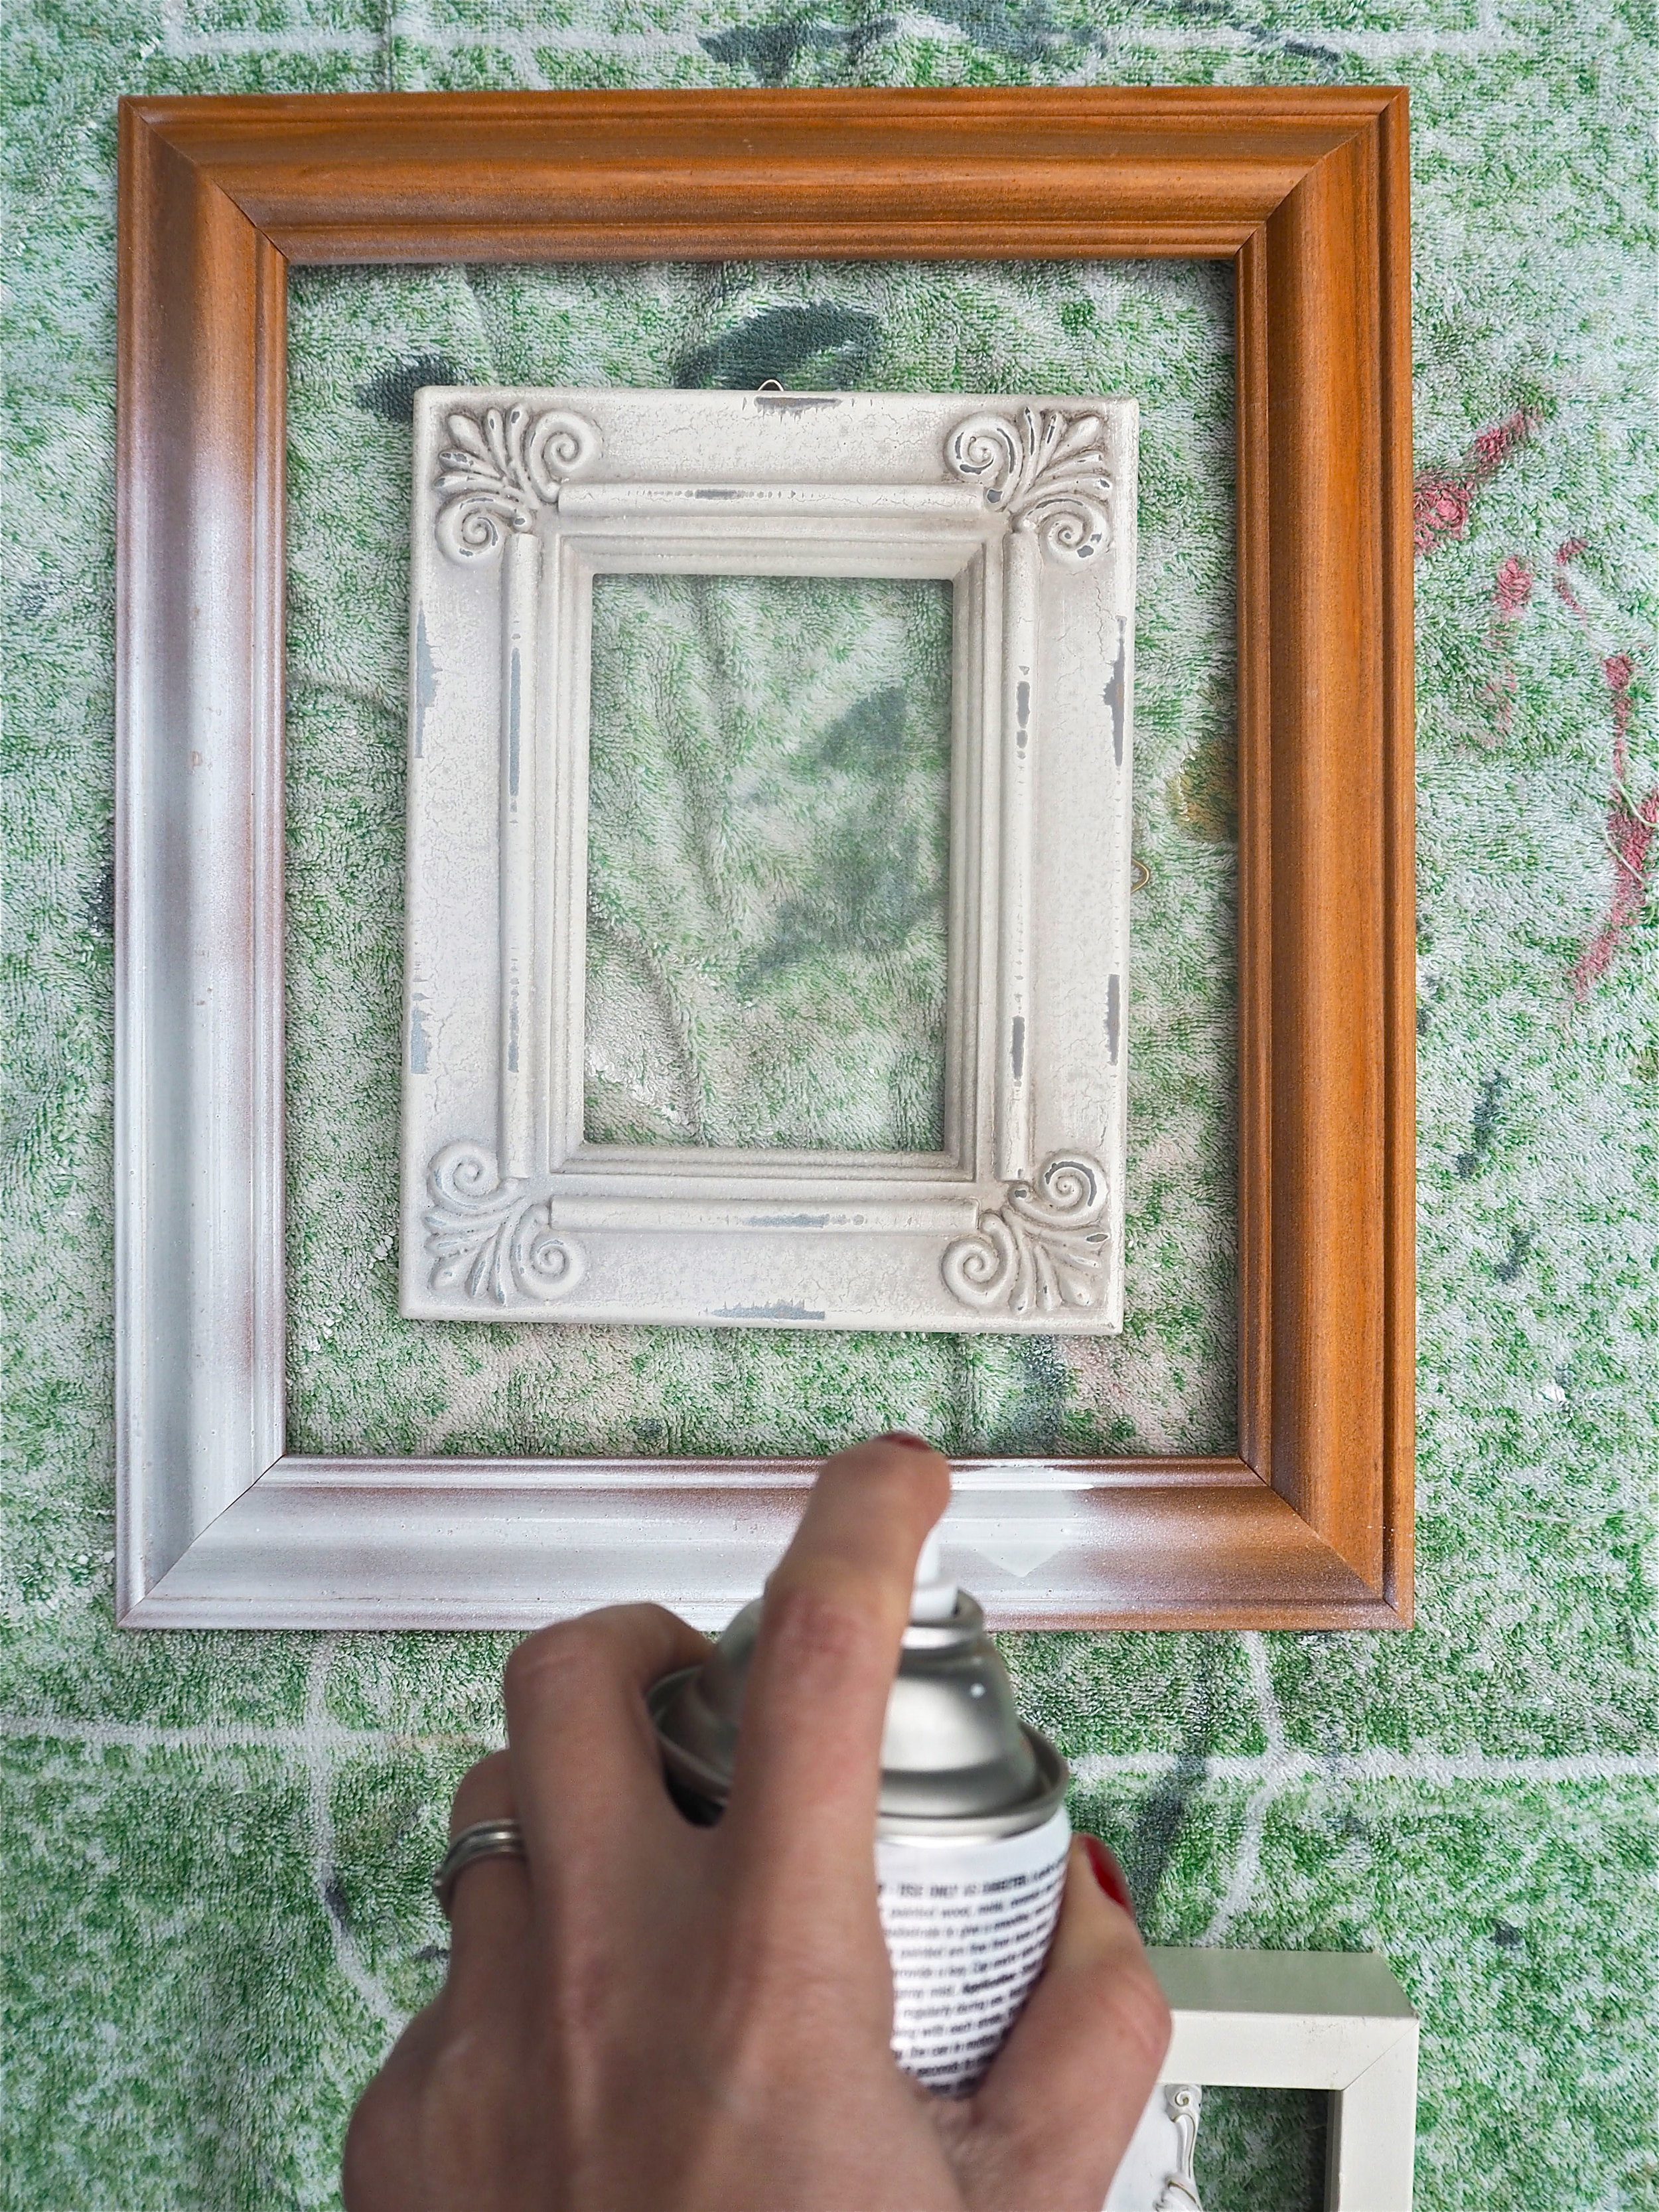
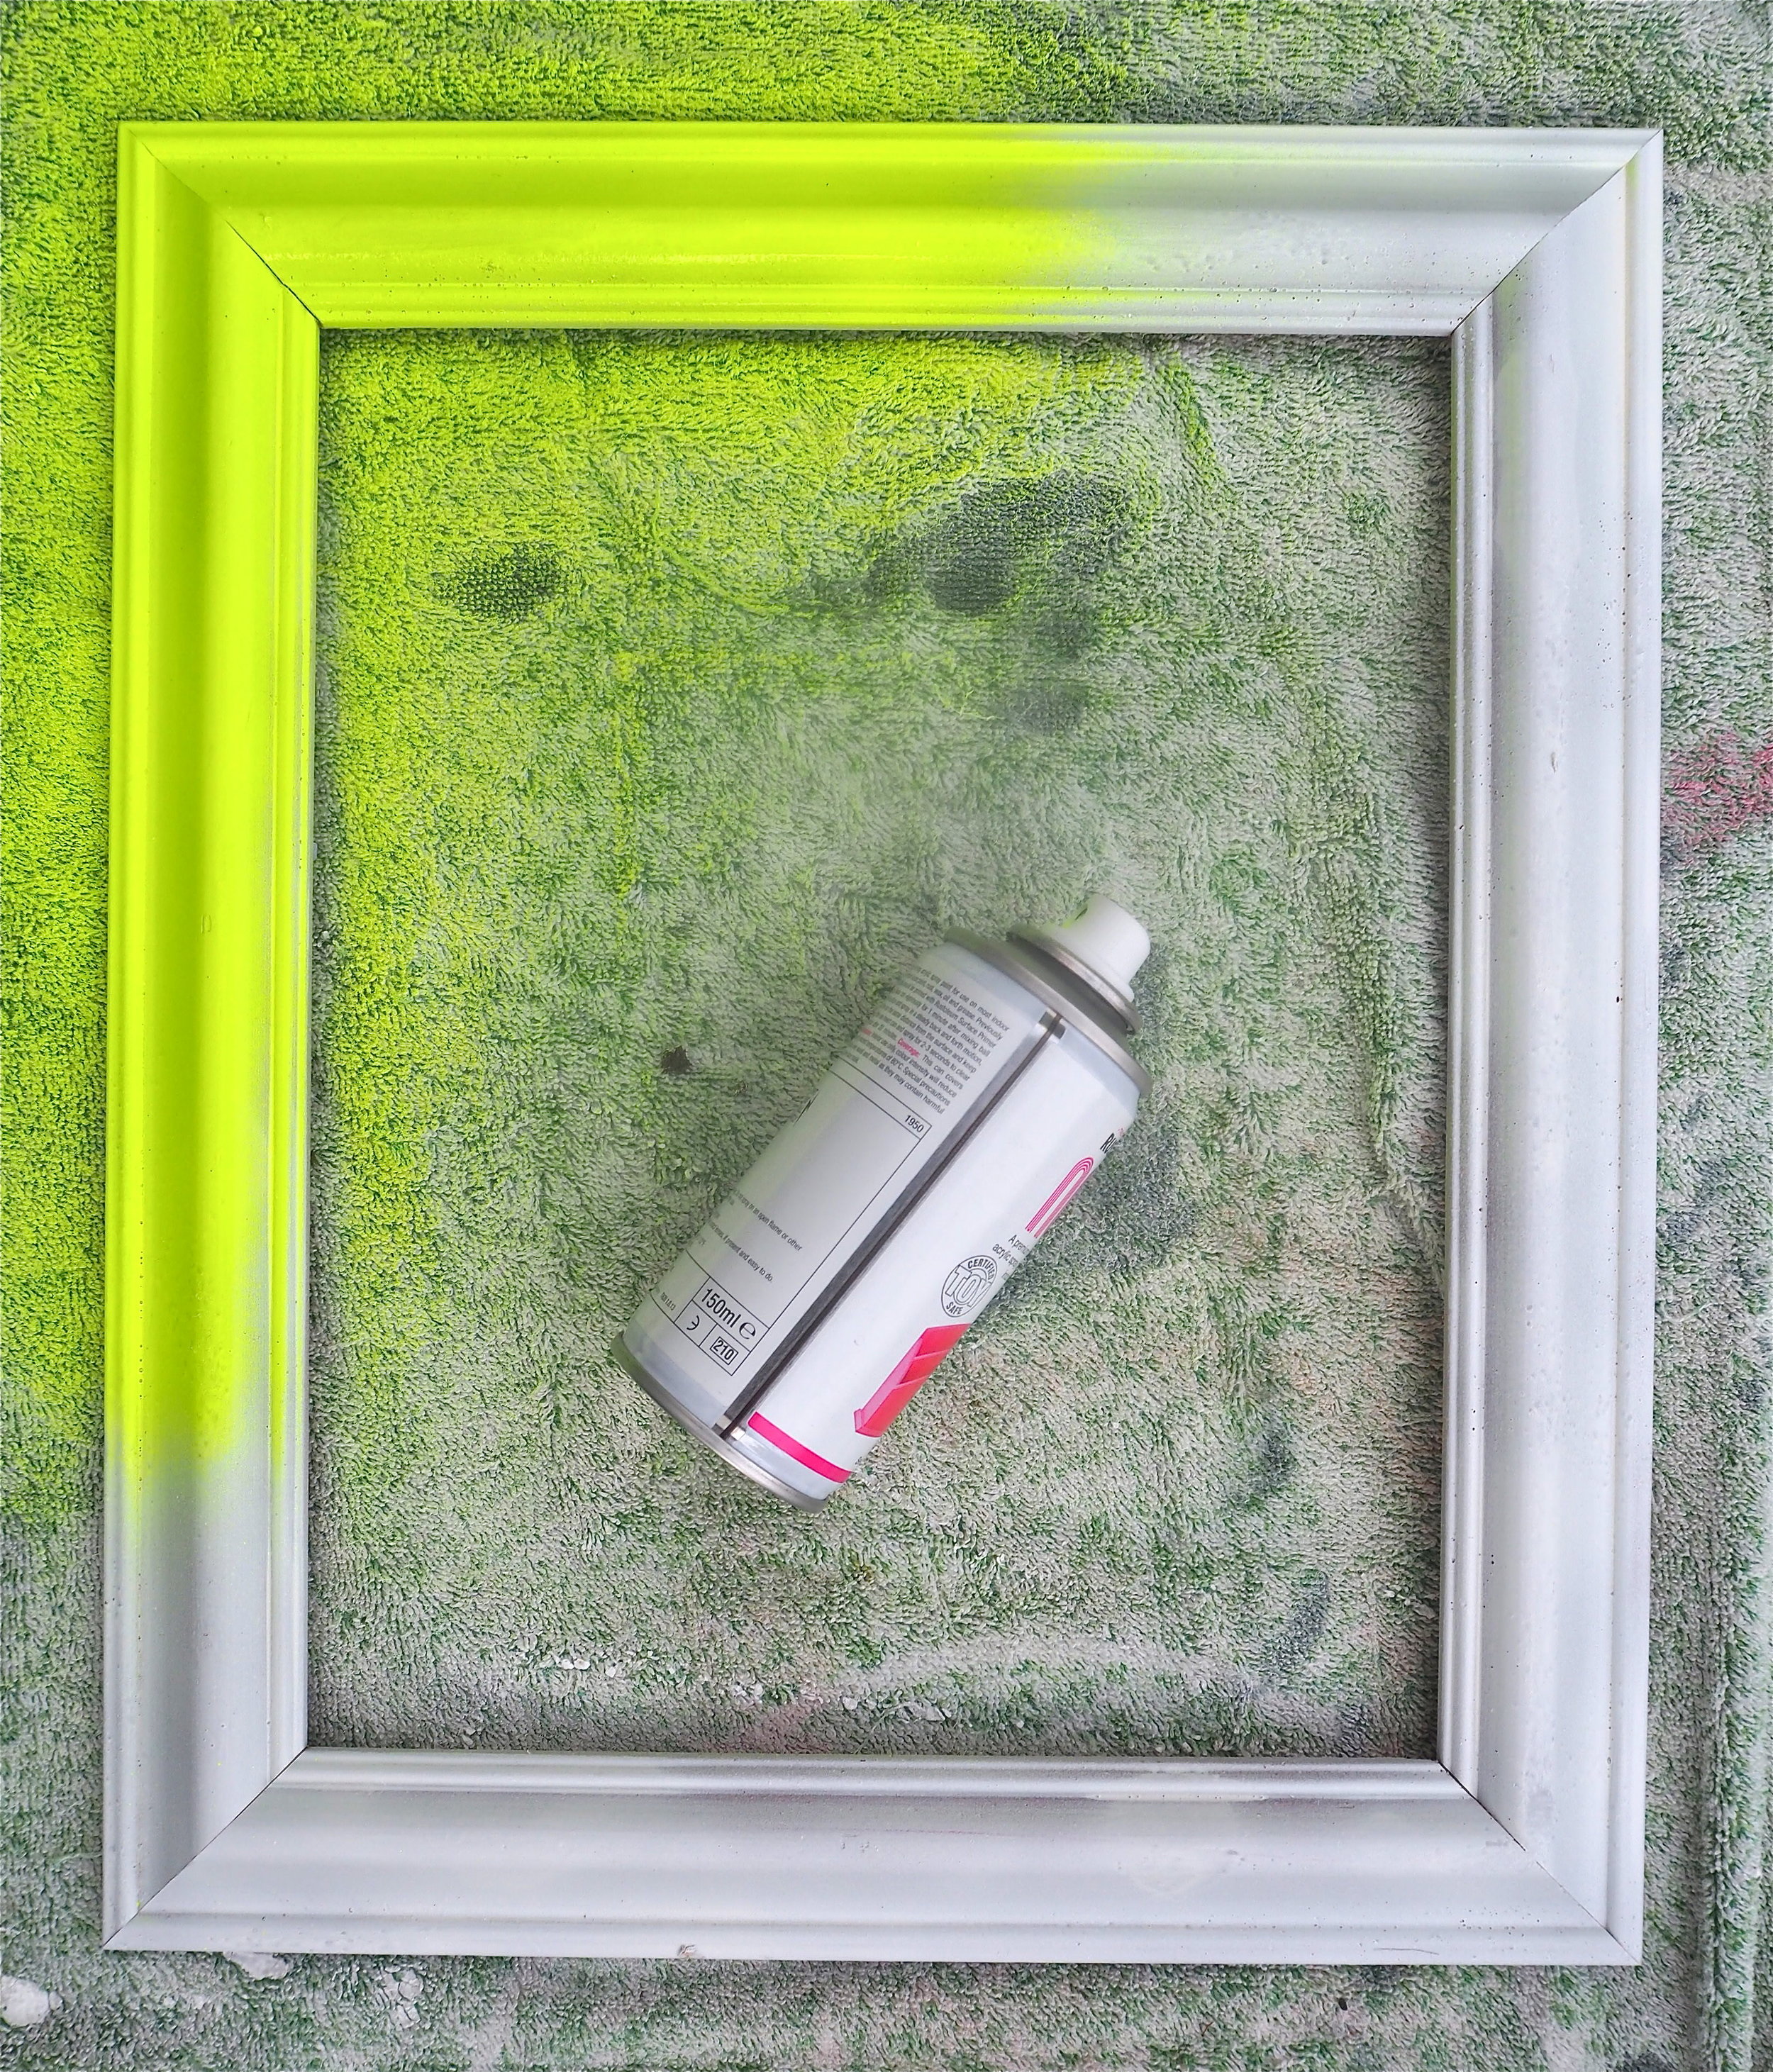
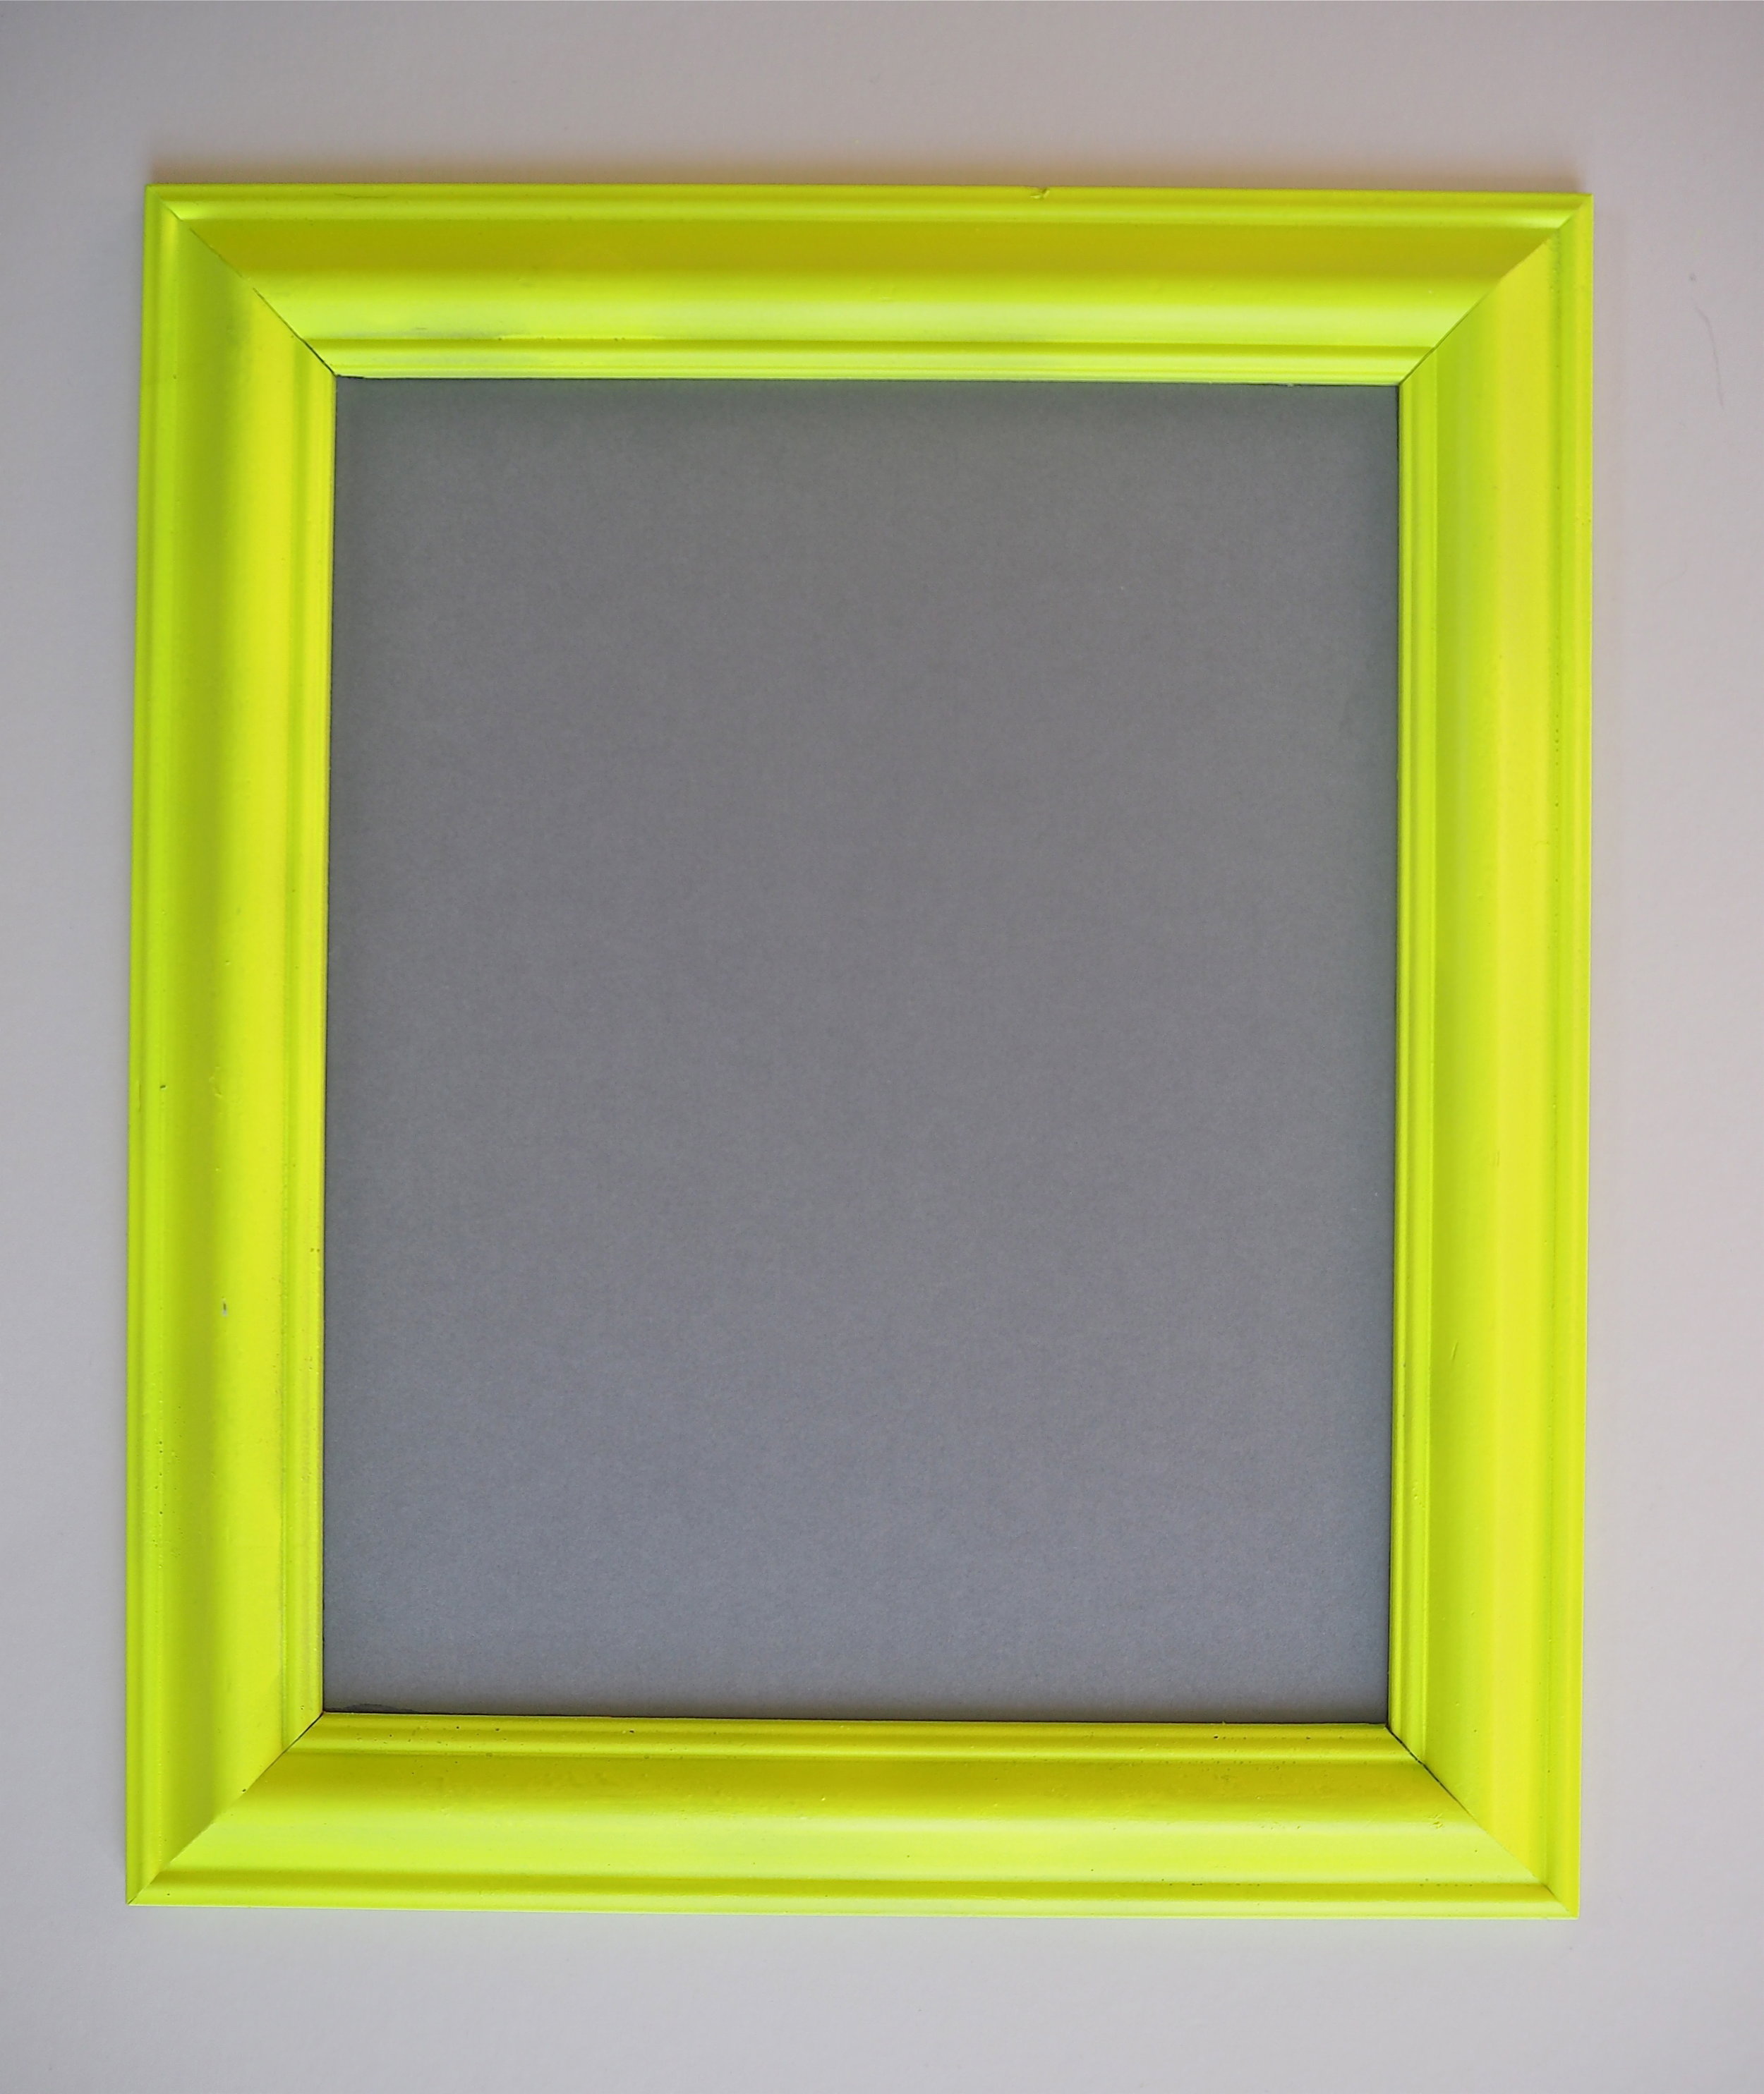
To make my frames less mismatched and more interesting, I sprayed them all in a variety of bold colours. First of all, I cleaned the frames by wiping them down in soapy water so they didn’t have any dirt or grease on them, then once dry I gave them all two coats of primer in spray-paint form. Once the primer was dry, I used the small craft tins of gloss spray paint to add some colour. I gave all the frames two coats, making sure the frames were covered in paint from each angle.
Once the frames were dry I set about creating the mount to sit inside the frame. To create the mounts I purchased a couple of coloured mounting card boards from a craft supply shop. You need your mount to be strong and not bend as a thin piece of card will not take the weight of a plastic dinosaur. If your frame came with glass you may wish to place a piece of coloured paper behind the glass and glue the dinosaur directly on top of the glass. Both the mounting card and glass options work well for this DIY.
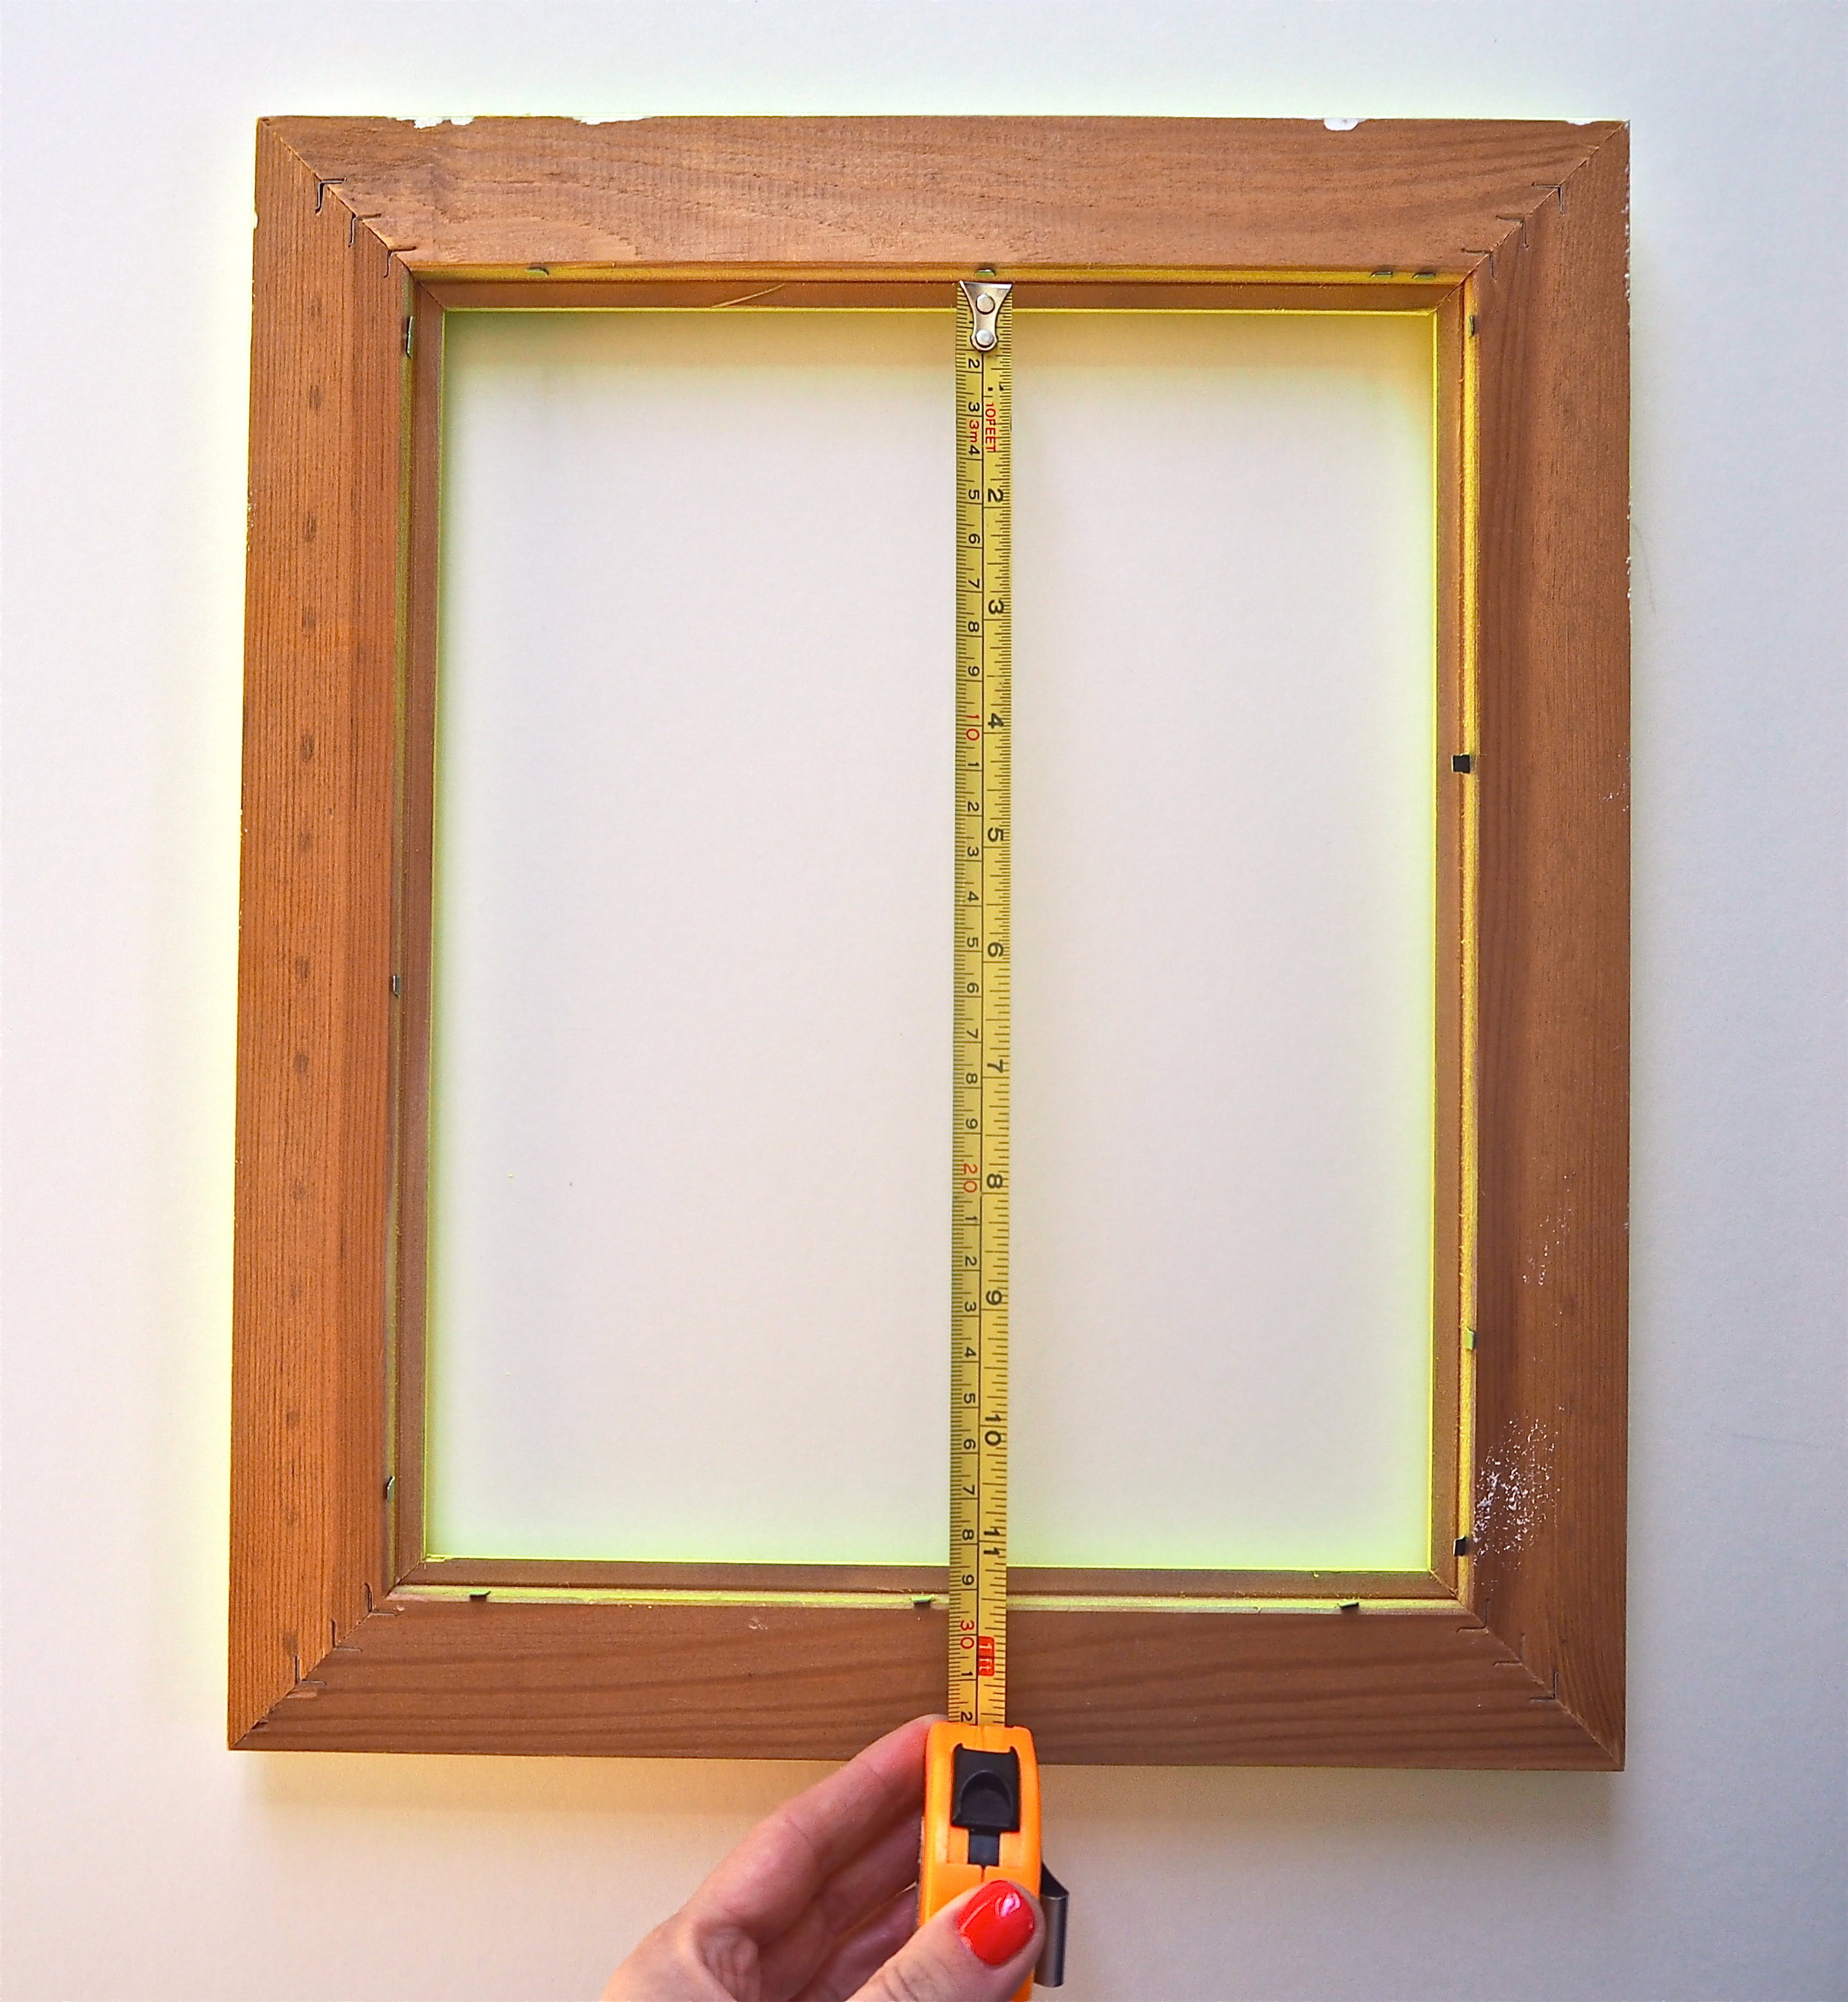
To create the mount I measured the inside of the frame or drew around the glass that it came with. I then cut out my mount with scissors and made sure it fitted my frame and could be easily inserted. Once I was happy with the mount size I applied a small amount of Gorilla Super Glue Precise Gel to the inside of the frame and stuck my card down so it did not shift or move about inside the frame and was completely secure.

Once I was happy with what dinosaur suited a particular frame, I applied Gorilla Super Glue Precise Gel to the thin rim of the dinosaur innard. As the application is so exact, I did not have to worry about the glue spilling over the edges of the dinosaur and marking the mounting card.
I carefully positioned the dinosaur front where I wanted it to sit in the middle of the frame and held it in place for 10-45 seconds in order for the glue to adhere to each surface. I then allowed my dinosaur art to cure for 24 hours until the glue had completely set.


Gorilla Heavy Duty Mounting Tape provides a quick and easy solution to provide a strong and secure, permanent bond to a surface. I simply cut the tape to size with scissors, applied it to the back of the frame vertically (Gorilla recommend this), removed the protective liner then pressed the frame firmly on the wall for a few seconds to grip.


My son loves his 3D dinosaur gallery wall and it makes a real statement as part of his bedroom decor. As Gorilla Glue can take real impact, I also know the dinosaurs can take a few knocks without falling off the wall or coming apart.

The cast-iron period fireplace in my kitchen had not been looking its best for a good while. The front of the fireplace had glimmers of rust (I’ve since found out you should never clean a fireplace with a wet rag or it will rust - who knew??) with the edges of the fireplace having a chalky white rust all around. Before I completely redecorated this space I needed to sort it out. It was suggested to me by a lot of people that I give the fireplace a coat of black metal paint, but I knew that would completely ruin the beautiful iron shine and make it look flat and inauthentic. Instead, I wanted to restore this fireplace properly, so I did quite a bit of research into how I could do that. I purchased the following products and hoped for the best, luckily the fireplace turned out better than I could have ever expected! This is why I want to share this on the blog today as I was so happy with the result and thought it might help others (this post is in no way sponsored, I purchased these items with my own money).
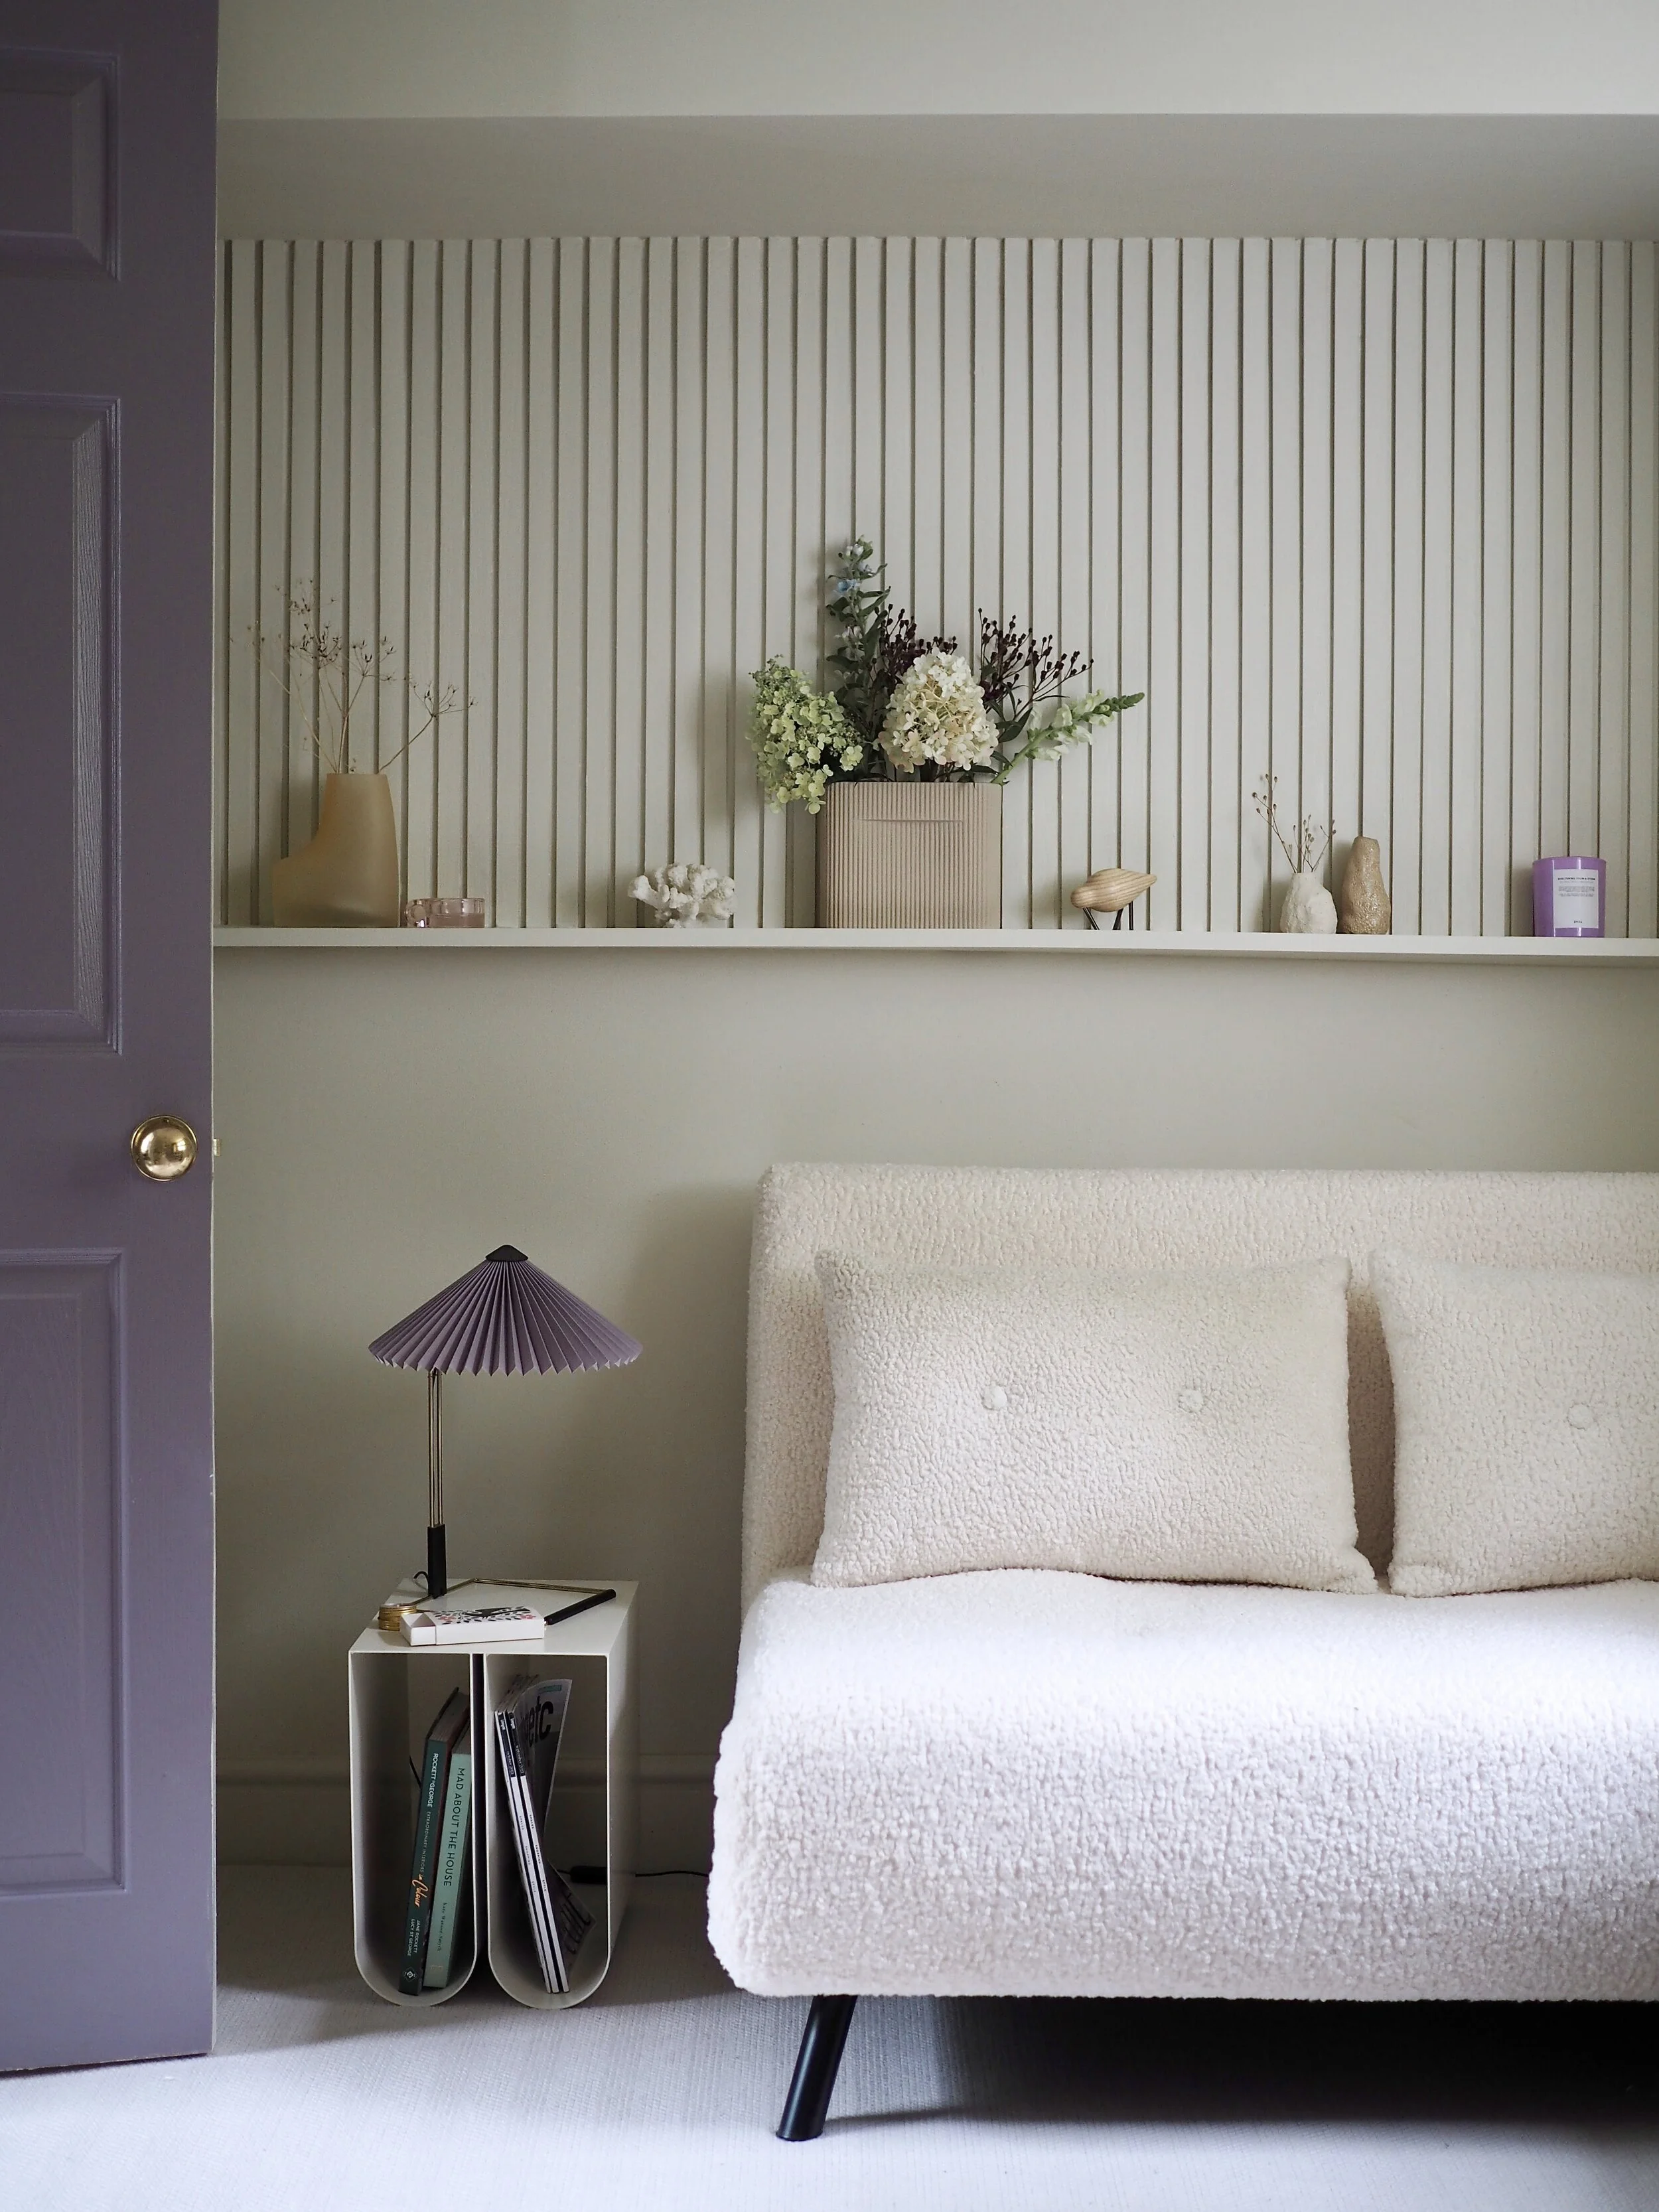
Read MoreIn the first few months of starting this blog I attempted a little DIY of adding some home-made wall panelling over a damaged wall in my hallway. Fast-forward a couple of years and this blog post is still my most popular post ever. Even though I look back on the whole post (the terrible photography, the over-linking, not to mention the shoddy DIY job itself!) and cringe a bit, it points out that loads of you actually want to DIY wall panels in your own home, and are seeking out how to do it online.
Read MoreThere are a few reasons as to why I decided to attempt a DIY kitchen splash-back, even though I had never tiled before in my entire life! The main and most obvious reason was of-course money. Our old cooker had died a very sad death the day before Christmas and we couldn't get one the same size, so we had to have someone come and cut away the worktop and a section of the units to fit in the wide new cooker. We then had to have a joiner in to re-build part of the base units once the installation was complete. The wall tiles also came a cropper as part of the switch-over, but I just did not have a spare £500 to give a professional tiler to come and sort that out aswell. Yet, another reason apart from money was that I had discovered the new Syren range of wall tiles by Topps Tiles.
Read MoreI had long admired the many amazing Ikea Billy Bookcase hacks that are all over Pinterest, so being on a tiny budget and for the love of DIY, I set about making my own version!
Read MoreA big mistake that people make with hallways is they think they have to keep them plain and neutral in colour. The fear is that an often narrow space will feel even narrower and enclosed if it is painted anything other than white. The truth is having a hallway in a deep colour will actually make the rooms coming off the hall feel much larger and brighter as you walk into them.
Read MoreThe 12th - 18th March 2018 is National Home Improvement Week - a week to inspire, celebrate and enable people to improve their own homes. So when DIY & Home Improvement online marketplace Mano Mano asked me to share a great DIY that people could easily copy, I instantly thought of the nursery project that I had recently carried out for one of my clients.
Read MoreI'm currently re-vamping our home office as it had turned into a complete disaster area. The home office had belonged to my husband until this blog came along, then unfortunately for him I intruded on this room as well. One of the problems that I caused was that I had paint charts and fabric samples strewn everywhere, and whenever I needed to find one of these quickly, it was in a pile somewhere either on the floor or on the desk.
Read More
My mother-in-law recently asked me to cover an old headboard in her guest bedroom and add in tufted buttons (that trick which creates the plush diamond pattern effect). I'd never upholstered a headboard before, but spurned on by how well my pink velvet bedroom bench came out, I watched a few YouTube videos made by an American upholstery company, made notes, then went about sourcing the items required to do the job.

This wallpaper is called Azul by Harlequin.
To upholster a headboard you need the following:
Upholstery fabric big enough to cover the front of the headboard and be wrapped around the back (around 10 cm from the headboard edge.)
A staple gun and staples
Self-cover buttons. I brought mine from Hobbycraft.
Scissors
Tape measure and ruler
pencil
Really strong thread (not cotton thread).
Large needle
A drill

The headboard it in it's original form. The colour was nice but the fabric was old and stained.

How the headboard looks now.
First off I laid my fabric face down on the floor, placed the headboard upside down on top, then made sure that I had enough fabric to pull round the edges to the back of the headboard.

Pulling fabric over onto the headboard so that it's taught, I used the staple gun to staple it in place:

Once the fabric was stapled in position, I checked for any loose areas of fabric and pulled and stapled them down so the headboard looked tidy. Double check there are no loose or lumpy areas, then cut away any excess fabric:

Turning the headboard face-forward, I used a tape measure and a ruler to mark where I would like the buttons to be positioned to create the diamond tufted effect. I measured the headboard length-ways from the top of the headboard where I wanted the buttons to start, then divided the area in half. I then marked where the 2 buttons would need to sit and worked down the headboard. The key here is to get your measurements right. Each button should be the exact distance apart, both side to side and up and down from each other. The best way to imagine this is as if to place a grid over the headboard:

Work in a grid pattern when measuring where to place your buttons. Each button should be the exact same distance apart. Please note that this image is an example of how to think about spacing your buttons rather than pattern choice (you can choose lines or a diamond pattern).
I then carefully used a drill to drill a hole through the headboard where each button should be. You have to take great care here to apply pressure right away so your fabric does not get caught in the drill and tear.
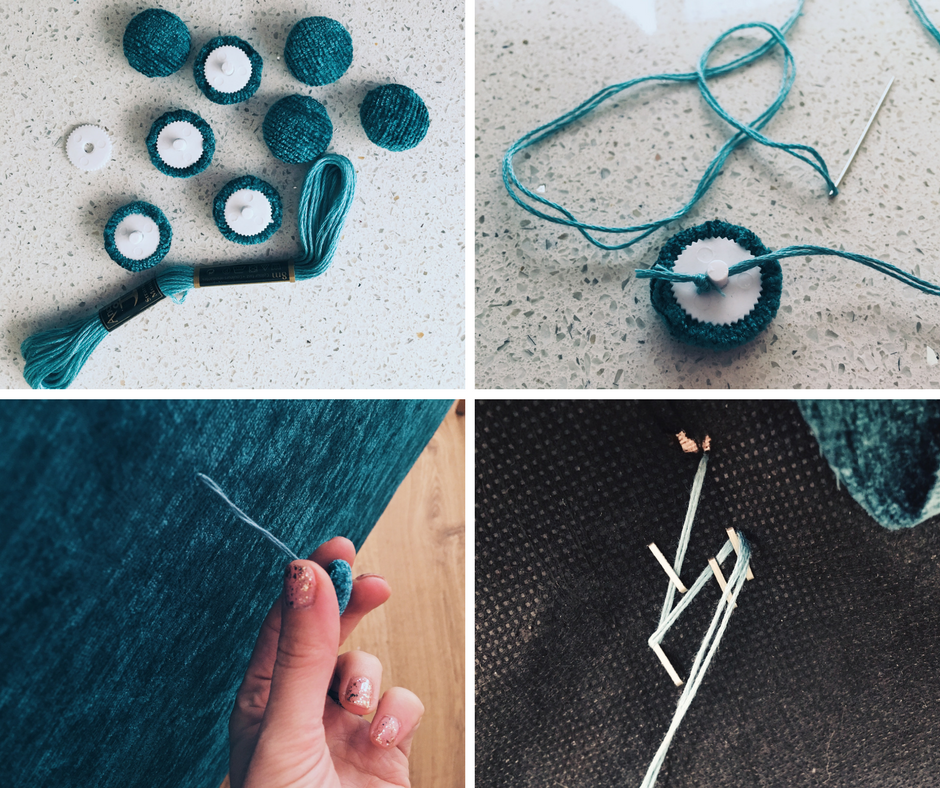
Take a snap button, remove the top and then cut a circle of your headboard fabric a few millimetres bigger than your button head. Fold and tuck the fabric around the button head, then snap on the base. Push any loose pieces of fabric into the snap button using the tip of scissors. You can find detailed instructions on doing this here.
Thread your needle, then push your needle through the drill hole you have created on the headboard. Put your finger on the button and slightly push it down, pull your thread tight with your other hand, then staple the thread in place at least 3 or 4 times with the staple gun. I zig-zagged the thread as I stapled it to secure it better. Repeat this for all your buttons!

Ta-da! One reupholstered headboard with tufted buttons.
Upholstering this headboard was actually quite easy. Next I'm thinking of trying a chair. Have you re-upholstered with success? If so let me know in the comments section below....
When I was younger I remember pressing flowers by sticking them inside a heavy book, then putting them in the airing cupboard for 3-4 weeks. I've only recently found out you can actually press flowers really quickly using an iron! I brought one of those cute brass and glass hanging frames in the January sales and I wanted to put pressed flowers inside. I decided to give the iron trick a go, and it totally worked!
Read More