Bedroom Wardrobe Hack! How To Upgrade The Doors With Decorative Fabric
How I transformed by old bedroom wardrobes with this simple DIY!
Read More
How I transformed by old bedroom wardrobes with this simple DIY!
Read MoreThese 10 space-saving tables are compact and stylish…
Read MoreHow to pick the perfect pillow for you…
Read MoreSimple tips for difficult spaces…
Read More5 brilliant DIY headboard ideas for your home…
Read MoreAD/Sponsored Content: Improve your sleep in the New Year with these 5 simple tips…
Read MoreRead all about my latest IKEA hack: a floating dressing table in my bedroom which gives me loads of storage but takes up little space…
Read MoreOne of the most transformative DIYs that I have recently undertaken was to recover my old bed frame. Read my step-by-step guide on how to do it here…
Read MoreIt has been a long time coming, but finally, I am delighted to reveal my lockdown bedroom makeover, decorated during the 2020 pandemic…
Read MoreI’ve been working on a total overhaul of our master bedroom for a number of weeks now, so today on the blog I thought I would share some of the decor ideas which led to the design of the new room scheme and how I use Pinterest to collect inspiration…
Read MoreA few years ago when maximalism was the big interior trend, I papered all the walls of our master bedroom in a heavily-patterned, floral blue wallpaper. To accompany it, I painted everything else in the room a deep blue to match. While I loved this look for a while (and I still love the wallpaper design), I quickly yearned for a much more calming space to wind down, read, sleep and get dressed in. The room gets a lot of light with two windows in it, yet the deep shade of blue sucked that beautiful morning light away. The jazzy wallpaper pattern didn’t feel soothing or resting and didn’t provide the blank canvas required when choosing what to wear for the day (all the colour and pattern of my clothes intermixed with the wallpaper and the blue, making everything clash).
Read MoreLately I have really noticed a shift towards people wanting to live much more ethically within their own home. Showers and white goods that save water have been around for a good while now, while the introduction of new technology has meant that we can get much more of a grip on how much energy we are using (and money we are spending). However, things seem to be taking a bigger step towards purchasing homeware products that are re-usable, recyclable and cruelty-free. Last month at the Ideal Home Exhibition interior designer extraordinaires 2LG created a 'love/work' space that encompassed the use of vegan leather and worktops made of recycled yogurt pots. The result was impeccably sexy and stylish, a million miles away from what could be considered by some as a 'hippy-chic home'.
Read MoreAccording to the interior mags and those 'in-the-know', minimalism is out for 2018 and maximalism - vibrant colours, patterns and a 'more is more' approach - is in. Being much more on the maximalism side than minimalist, I was pleased to hear this as I have just finished decorating my bedroom in Farrow & Ball's new Hegemone wallpaper, and giving my bed a fresh new update in beautiful, luxurious Yves Delorme bed linen.
Read MoreAfter the Revamp, Restyle, Reveal bedroom reveal, I've had loads of questions about where my new large brass-trim dressing table mirror is from. The answer is it's actually a DIY job and it cost me £9.37 in total! So, today on the blog I am going to tell you how I made it.
Read MoreDo you find items piling up in your house? Need to make way for the new by storing away the old? Cupboards already bursting at the seams? With price per square metre of homes at a (lets face it, constant) high, you don't want to be paying out for lots of cupboard space. The solution? Being clever with storage. Be smart and savvy when purchasing furniture and make sure that bulky items come with added storage space.
Read More
My mother-in-law recently asked me to cover an old headboard in her guest bedroom and add in tufted buttons (that trick which creates the plush diamond pattern effect). I'd never upholstered a headboard before, but spurned on by how well my pink velvet bedroom bench came out, I watched a few YouTube videos made by an American upholstery company, made notes, then went about sourcing the items required to do the job.

This wallpaper is called Azul by Harlequin.
To upholster a headboard you need the following:
Upholstery fabric big enough to cover the front of the headboard and be wrapped around the back (around 10 cm from the headboard edge.)
A staple gun and staples
Self-cover buttons. I brought mine from Hobbycraft.
Scissors
Tape measure and ruler
pencil
Really strong thread (not cotton thread).
Large needle
A drill

The headboard it in it's original form. The colour was nice but the fabric was old and stained.

How the headboard looks now.
First off I laid my fabric face down on the floor, placed the headboard upside down on top, then made sure that I had enough fabric to pull round the edges to the back of the headboard.

Pulling fabric over onto the headboard so that it's taught, I used the staple gun to staple it in place:

Once the fabric was stapled in position, I checked for any loose areas of fabric and pulled and stapled them down so the headboard looked tidy. Double check there are no loose or lumpy areas, then cut away any excess fabric:

Turning the headboard face-forward, I used a tape measure and a ruler to mark where I would like the buttons to be positioned to create the diamond tufted effect. I measured the headboard length-ways from the top of the headboard where I wanted the buttons to start, then divided the area in half. I then marked where the 2 buttons would need to sit and worked down the headboard. The key here is to get your measurements right. Each button should be the exact distance apart, both side to side and up and down from each other. The best way to imagine this is as if to place a grid over the headboard:

Work in a grid pattern when measuring where to place your buttons. Each button should be the exact same distance apart. Please note that this image is an example of how to think about spacing your buttons rather than pattern choice (you can choose lines or a diamond pattern).
I then carefully used a drill to drill a hole through the headboard where each button should be. You have to take great care here to apply pressure right away so your fabric does not get caught in the drill and tear.
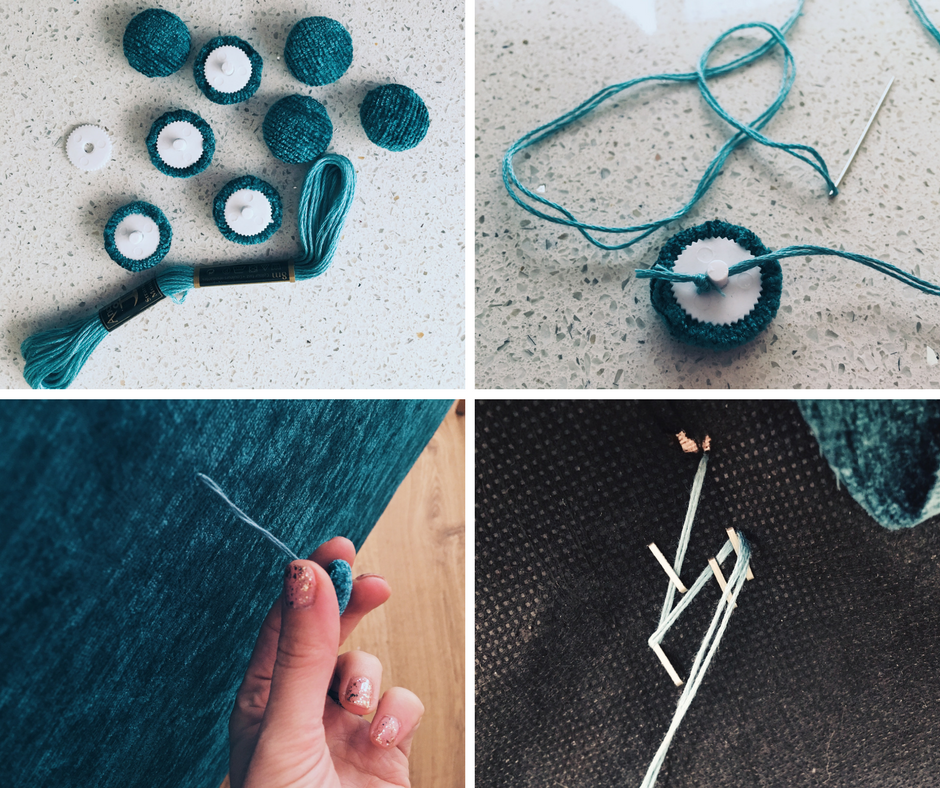
Take a snap button, remove the top and then cut a circle of your headboard fabric a few millimetres bigger than your button head. Fold and tuck the fabric around the button head, then snap on the base. Push any loose pieces of fabric into the snap button using the tip of scissors. You can find detailed instructions on doing this here.
Thread your needle, then push your needle through the drill hole you have created on the headboard. Put your finger on the button and slightly push it down, pull your thread tight with your other hand, then staple the thread in place at least 3 or 4 times with the staple gun. I zig-zagged the thread as I stapled it to secure it better. Repeat this for all your buttons!

Ta-da! One reupholstered headboard with tufted buttons.
Upholstering this headboard was actually quite easy. Next I'm thinking of trying a chair. Have you re-upholstered with success? If so let me know in the comments section below....
For over a year, me and my husband had been in mattress hell. Our existing 10 year old mattress was a disaster (apparently you're only meant to have the same mattress for 8 years max anyway?) The springs were pushing out everywhere (no doubt not helped by a toddler who loved jumping on it multiple times a day). Obviously, it wasn't a dream to sleep on. You can see for yourself without even needing to lay down on it that the mattress had seen better days.....
Read MoreI am a complete sun worshipper, but uncomfortable summer nights all humid and sweaty with no air-con are definitely the worst thing about summer. That's why when Autumn kicks in it feels extra lovely to snuggle down all warm and cosy in your bed. Autumn is therefore the perfect time to update your duvet covers and pillow cases for snooze-season (or, if like me you have a small child, dream about being in your bed rather than it being a reality...) There are some pretty cool duvet cover designs out there at the moment, so I've picked my favorite reasonably priced bedlinen available to buy online right now....
Read MoreI have to admit I spend a fair amount of my time online just saving images of pink and gold chairs and sofas. Seriously, if you follow me on Pinterest and look through my boards it's all full of pink and gold decor. Blush pink in interiors has been huge for 2016, and as the metallics trend continues to thrive blush pink and gold has been featured a lot in furniture and homeware by brands such as West Elm. The new Tom Dixon designed resturant Bronte in London is also awash with dusty pink chairs and a candy pink concrete bar. I LOVE pink and gold together, but seeing as I wasn't going to be able to convince my husband that we needed to replace our perfectly fine sofa with a pink number anytime soon, I decided to bring a bit of pink & gold in the bedroom by DIY-ing a pink & gold bedroom bench from scratch.
Read MoreBaby is on its way - time to turn that guest bedroom/home office/place you hang damp washing/dumping ground for the hoover and the ironing board into a proper bedroom that you will spend more time in than you ever imagined feeding/nappy changing/begging for your sanity. It will also be frequented by a vast stream of guests, as well as being your new little pals first bedroom where they sleep (hopefully) for their first few years in the world.
Before baby is even here it's hard to imagine them as being anything other than that - a baby. Yet give what seems like 5 minutes and your baby is a proper mini-adult and that pastel room with a farm animals mobile is looking dated and in need of redecoration. It is best to get it right first time round, so take a peek at my simple steps below on how to style a child's bedroom that will take them from age 0 to 8-10...
Read More